A while ago I was suddenly hit with what I thought was a very good idea -- to try to use the same kind of WOOD-CHIPS I used to build a nice little rocky hill (LINK to prior blog post) in a different way -- specifically, to turn them on their ends and use them VERTICALLY, instead of stacking them horizontally. I thought this might give a more dramatic, "spire"-like effect. But I was very busy with work and family, and also other hobby-related stuff, so I didn't get around to putting the idea into practice for a while.
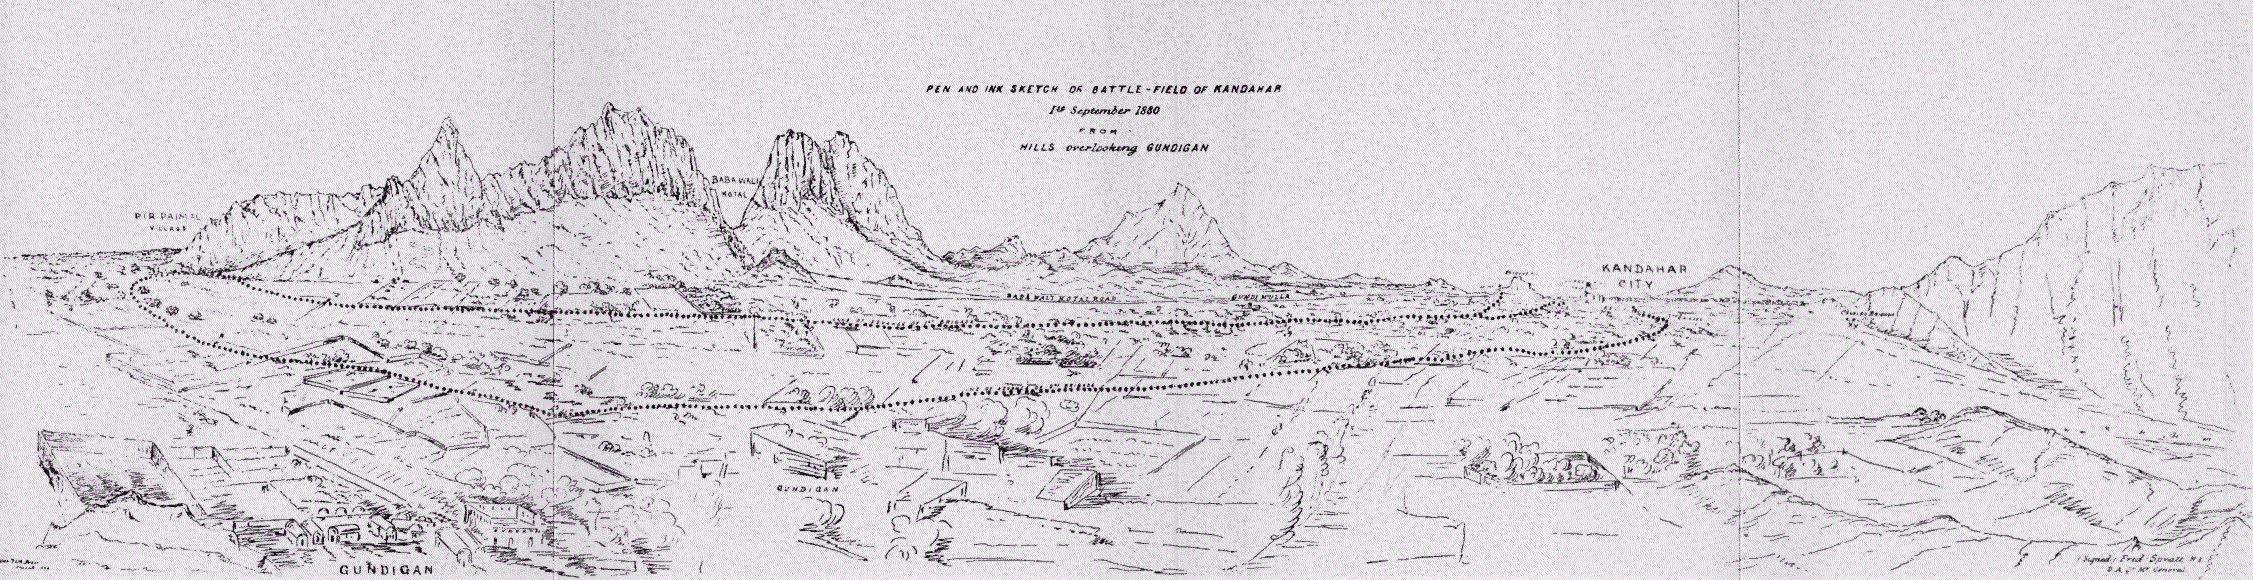
Then I came across this pair of images on the web, and they gave me the final push to get the "vertical" wood-chip hill done.
The first comes from Lord Roberts' autobiography "41 Years in India," and is a very striking sketch of the battlefield of Kandahar, as seen from the hills above the village of Gundigan. The most prominent terrain feature is Baba Wali Kotal - the high pass through the mountains outside Kandahar...

...the second is a perhaps even more striking 1880 photograph of a portion of Baba Wali Kotal itself:

Both images struck me as lending themselves to being created in miniature - at least in an impressionistic, "high concept" amateur terrain-maker way - with "vertical" wood-chips.
I worked on this project just before my family and I moved house. My wife was not very happy that I was spending time on a hobby project while there was so much else to do, but I knew if I didn't finish before we moved, it would take months, maybe longer, before I'd manage to get back to it. I finished just in the nick of time -- and I also spent endless hours, unto days, packing, moving, driving back-and-forth, etc., etc., in service of my family. We moved on the day of New Years Eve - December 31st - and started 2012 in our new digs, which are currently under renovation, but will be very nice when we're done.
The move went pretty well, and I'm happy to say I think this new hill turned out quite nicely. When the time arrives, I plan to build at least one more, for use together as the tall hills or low mountains on both sides of various Afghan/NWF passes.
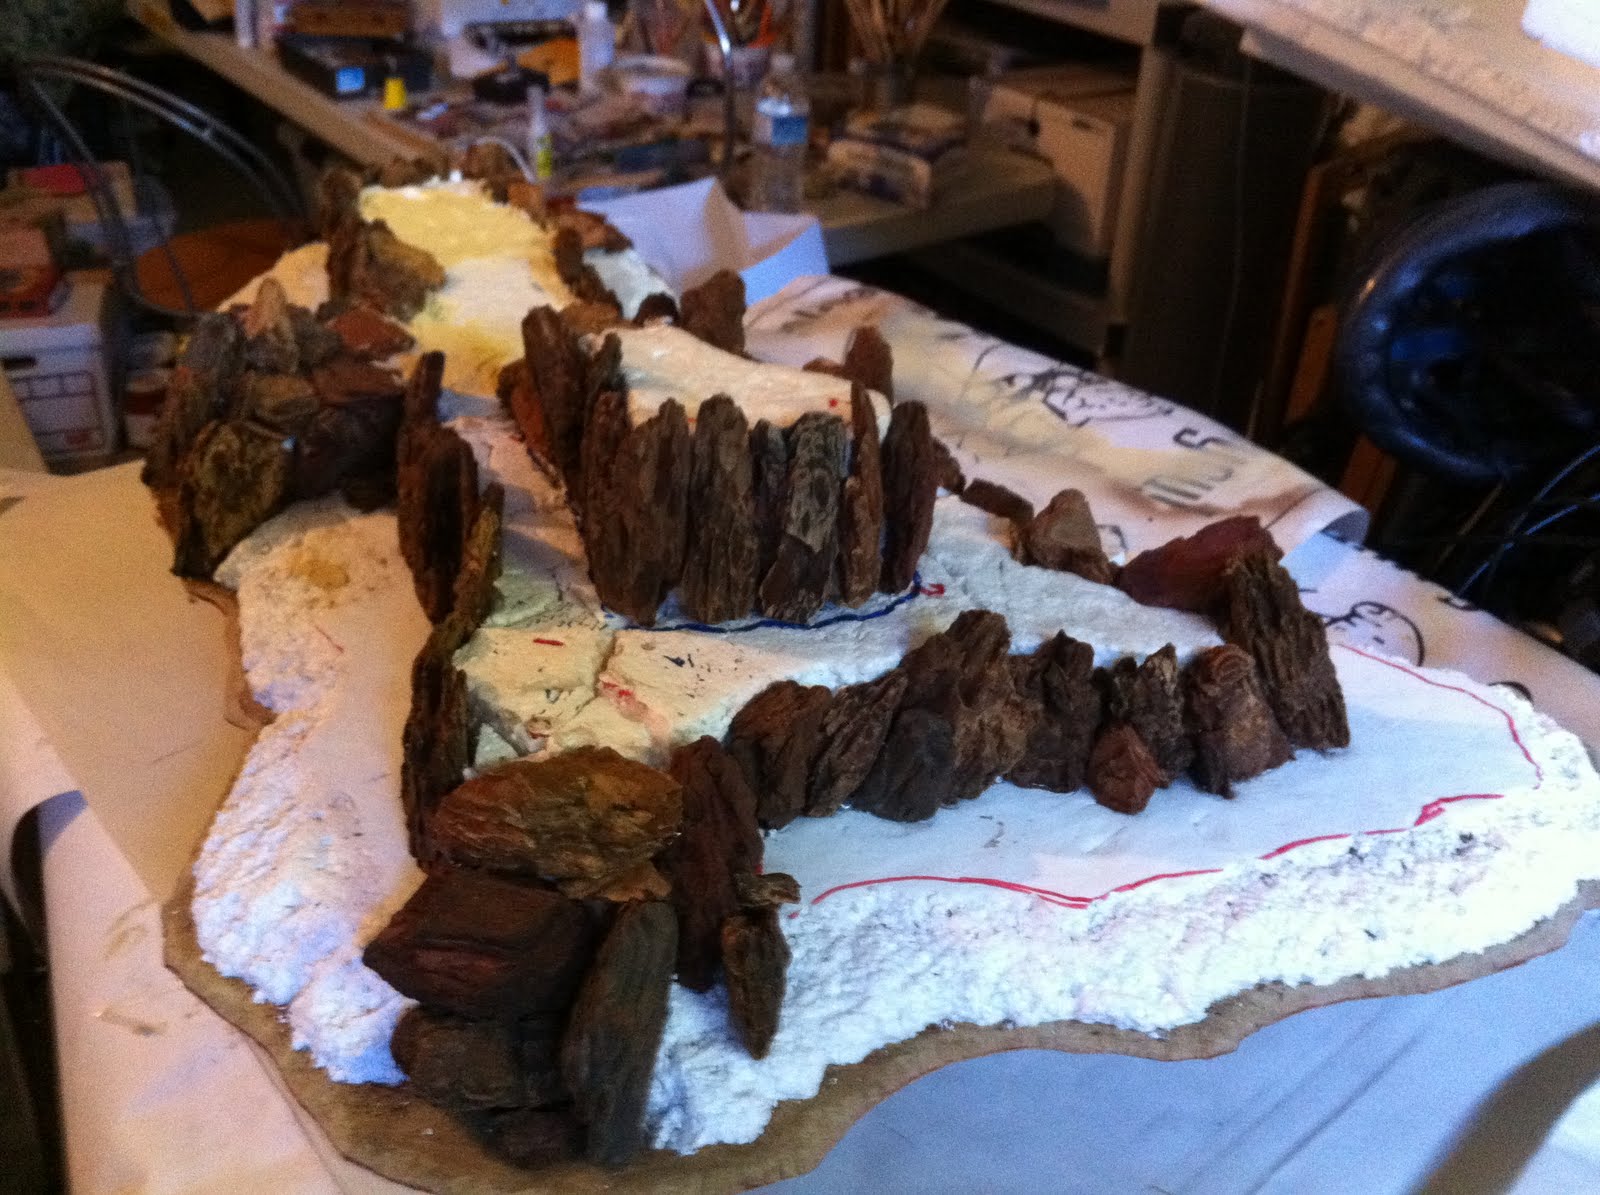
Here's some details to go with all the WIP pics below:
1) I picked up the baseboard piece for a very inexpensive price at my local lumber yard. I thought it was some kind of MDF/Masonite but it was incredibly strong/stiff - more so than even double-tempered Masonite in my experience - which was a good thing, once I managed to cut the shape I wanted out of it! Still not really 100% certain what it is though.
2) - Used rubber cement to glue the styrofoam down to the baseboard (did a test on a small piece first, and it worked very well).
- Used my handy-dandy - especially for this project - HOT GLUE GUN to glue the wood-chips to the styrofoam, and also to piece together the "jigsaw puzzle"-like interior structure of the 2 upper contours, also made from styrofoam.
- Used 3 long "cocktail sticks", in addition to the hot glue, to help fix the third - top - contour into place, impaling it firmly into the piece below.
3) Used my usual Elmer's Wood Filler to spackle the cut foam, simultaneously strengthening it while adding some nice texture.
4) Brushed on full-strength white glue where I wanted the pebbly texture to match my terrain board ground-cover, then strategically placed a few larger, more prominent pebbles, before pouring on Home Depot "Soil Erosion" ballast (a far less expensive alternative to model railroad gravel/ballast, which comes in handy for large terrain projects).
5) After the ground-cover dried, I collected all the excess ballast, then used an EYE-DROPPER to apply a coat of Woodland Scenics SCENIC CEMENT, to add another layer of fixative.
6) I skipped using black spray-primer, in favor of an inexpensive can of flat interior black latex house-paint, in order to avoid doing damage to any mistakenly unspackled spots of carved styrofoam. Better safe than sorry, despite the longer paint application time -- which I'm happy to say my youngest daughter - Sarah - helped me with a great deal. THANK YOU, SARAH!
7) I think that's about it, except for the colors:
- base coat of BLACK
- heavy coat of BROWN
- strong dry-brush of a 50/50 mix of CARAMEL and BLACK
- lighter dry-brush of MUDSTONE (dark shade of khaki from Delta Ceramcoat)
- very light highlight coat of SANDSTONE (pale shade of khaki from Delta)
- a few spots of medium grey, highlighted with light grey, on a speck of rock here or there.


Fantastic result!!Looks amazing.
ReplyDeleteHave to agree with Rodger Fantastic looking terrain you have really nailed this region!!
ReplyDeleteBest wishes
Willie
Wow, thanks, guys -- I think you both commented before I added the written text to this post!
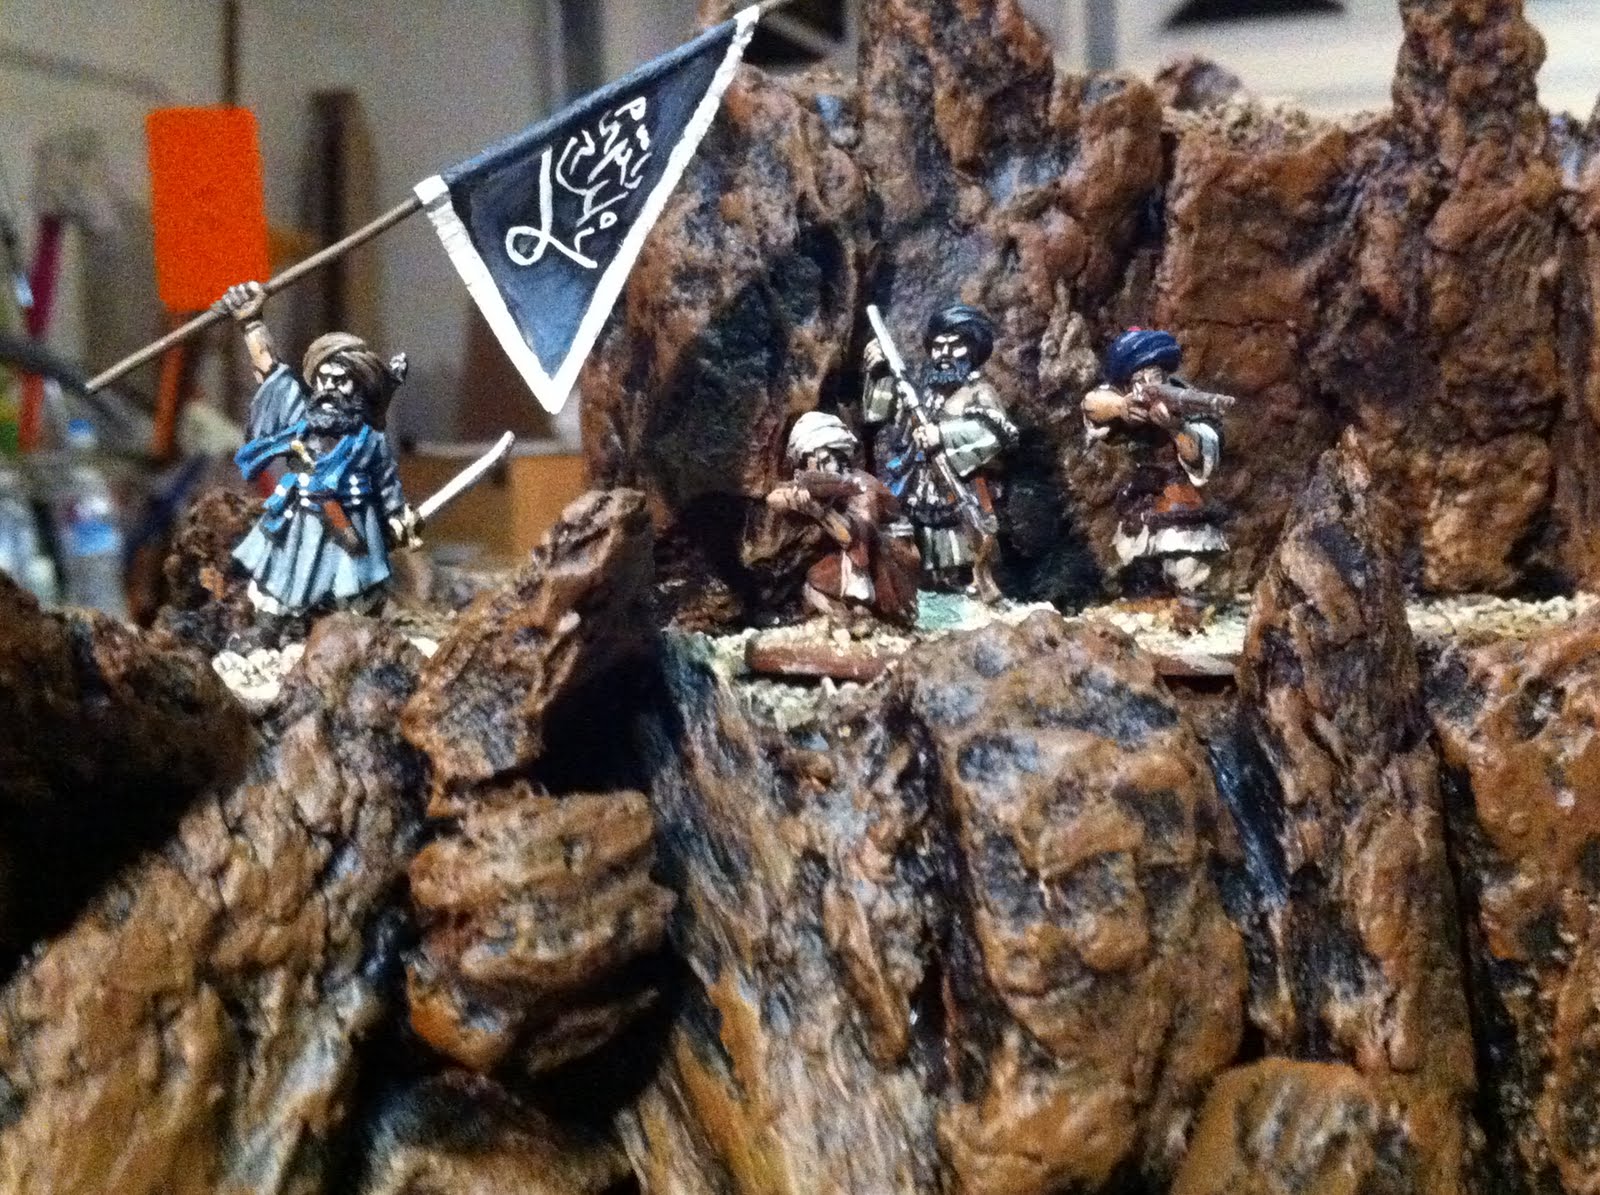
ReplyDeleteI really want to take some pics of the finished piece with some of my troops posed atop it, Tribesmen and Guides, or maybe the 72nd Highlanders. I put all of my troops into storage for the move, to avoid damage, and also to clear space in the new house until everything gets settled in. But I will head over to the storage place and pick up a couple of boxes to bring home for photo-opportunity purposes as soon as possible.
Thanks again, Rodger, and Willie, for your kind words!
Amazing piece and wonderful post! You really capture the rugged Afghan hills - Well Done!!
ReplyDeleteFrank
http://adventuresinlead.blogspot.com/
Oh my goodness! That is one of the most inspirational pieces of terrain I've ever seen. Absolutely brilliant use of a humble material to produce spectacular results. Well done that Man!
ReplyDeleteIt looks great! Should be a wonderful addition to your NWF games.
ReplyDeleteAlso, allow me to wish you and your family the happiest of times in your new home.
-- Jeff
Thanks very much, Frank, Michael, and Jeff! And a special thank you to Jeff, for the good wishes for my move! It went well, despite moving on December 31st! I moved almost all of my hobby stuff into storage just before the big day, to get it out of the line of fire, so to speak! We are still in the midst of doing work on the new house, but things are going pretty well, and I hope to have my new home-office done very soon, at which point I'll have a closet dedicated to storing miniatures and terrain, in addition to some nice curio cabinet and glass shelf bookcase display spaces. Still, it will be a while before I can build something or play a game, so I'm very happy I finished up this hill when I did.
ReplyDeleteWow, excellent piece! Very inspiring. And thanks for posting all of the pics. The visuals really help explain the entire process.
ReplyDeleteGlad you liked it, John, and thanks very much for taking the time to leave a comment!
ReplyDeleteThat´s got to be one of the most indepth and well written how to´s I´ve ever seen!!!! I was thinking how I could add some hills to my Khandbarian table. I was going to do my usual, snap a bit of insulating board, rough it up and paint it but know I know it can look WAY better. Thanks
ReplyDeleteCheers
paul
That's a superb, if rather daunting, piece of work there!
ReplyDeleteWho's the fellow with the book, and who manufactures him?
Thanks, Paul, and thank you, Rob. It's very satisfying to read more positive feedback here!
ReplyDeletePaul, as I posted on TMP earlier today, I am a long-time fan of yours, and the idea that something I did could be of use to you, makes me very happy indeed!
Rob, he is a Zulu War Correspondent, "seated on a saddle" or "leaning against a saddle", made by Redoubt. Their Zulu War range figures are extra large, more like 30mm, but since this figure is in the odd, re limit, pose, I think he will fit in well with the rest of my somewhat smaller troops, after he's been painted, of course.
"re limit" was meant read as: RECLINING.
ReplyDeleteOnly down-side of blogging, or commenting, via an iPhone, is it's much easier, at least for me, to miss TYPOS!!!
Fantastic tutorial, so many pictures! Well worth the scroll down to see the finished item, it looks as though its almost growing out of the base tiles it matches so well. Congratulations on another fine piece of work.
ReplyDeleteThanks very much for your comments, Volleyfire! "Growing out of the base tiles" is exactly what I hoped it would look like. After my house gets squared away - which will take some time - I am going to dive in to building a second, similar, terrain piece, and then play some games with lots of rocky hills being attacked and defended by various mixes of British, Indian, & Gurkha troops on one side, and tribesmen, Ghazis, and regular Afghan army troops on the other.
ReplyDeleteThat scenery is AMAZING! I've always wondered how to get height in a peice of scenery and I'm really lookinng forward to trying it myself. I have a very small table for 25MM and your solution is really going to help out. Thanks
ReplyDeleteJohn S. Beardsley
Colorado Springs CO
You're very welcome, John -- and thanks for taking the time to leave a comment! Things have been rather quiet around this blog for the past month, so it's extra nice to see someone leave a positive comment like yours. Best of luck with the new, taller, scenery for your table! When you're done, I strongly recommend you take some pictures and put them up somewhere on the web, to encourage someone else!
DeleteExcellent terrain and excellent blog. This has got to be the number one site to visit if you are into the NWF.
ReplyDeleteI have started doing the same sort of thing making Isandlwana terrain, using wood bark for rock face, which I will place on my blog at some point in the future.
Keep up the very informative and inspirational work.
Pat.
Hi, Pat! Hadn't spotted your above comment until just now, but it put a smile on my face, so better late than never! I'm a big fan of your own Silver Whistle blog, and especially love the post you did on converting the Perry ACW campsite figures into Zulu War Brits. I hope to do the same before too long -- though as you say, I'll do mine in Khaki, for service in Afghanistan and/or the North-West Frontier!
ReplyDeleteHi again,
ReplyDeleteI'm getting ready to start working on somethis likethis and the only question I have right now, is what thickness did you use for the styrofaom. It looks like 2"
John. S. Beardsley
Actually it's only 1" thick styrofoam. The 1/4" hardboard base, plus the wood-filler and ground-cover, combine to make it look thicker/higher. 2" would probably work fine, but would give a much steeper slope, or use up twice as much surface space getting to the usable flat-edge of the contour. Since you mentioned space bring at a premium on your table, I'd go with the 1" thick styro, or else just cut at a very steep slope, in order to preserve more flat playing space on surface of the contour. I like the look of the ratio the 1" foam base contour gives the finished hill. I just finished my 2nd one (hope to post about it soon) and used same size materials.
ReplyDeleteBest of luck with your project and hope you'll post some pics for the terrain world to see when you're done!
This comment has been removed by the author.
ReplyDeleteThat was inspiring Mad Guru! I have work to do in the Sudan that will be using your methods. Thanks,
ReplyDeleteLast Stand Dan
Hey, Dan! Cool to see you digging into the older nooks and crannies of this site! I'm guessing similar pine-bark wood-chips are easily available in the Denver area, right? Sadly, our Hobby Brethren in the UK and Oz seem to be meeting with frustration in most of their attempts to track similar material down overseas. I look forward to seeing you build some nice rocky desert heights for use in the Sudan!
ReplyDelete