This past Saturday, September 12th, saw a long-awaited event come to pass here at the Maiwand Day household: the first play-test of the Charasiab scenario I hope to bring to this year's Colonial Barracks V convention, which like the previous IV will feature a ton-and-a-half of "The Sword And The Flame" gaming as well as games using various other rules sets written by the Larry Brom.
Early on in the planning stages there was talk of "Last Stand" Dan Gurule out of Denver, Colorado, Jeff "Sgt. Guiness" Baumal out of South Florida, and my grand old partner in Maiwand Day crime Nick Stern from Northern California all visiting my place to partake in the action... but alas it was not to be -- none were able to make it.
Closer to home a fellow Colonial gamer from just around the corner in the nearby city of Pasadena, who I met a few months ago online over at the always good-natured and inspiring
LEAD ADVENTURE FORUM who really wanted to attend happened to be overseas.
I'm bummed none of those guys were able to be here but luckily for me three other gamers and friends did manage to make it...
Matthew Rigdon, a very good friend of mine, originally from Texas, a longtime gamer who joined me for the Maiwand Day games at Pacificon and Colonial Barracks I;
Michael "Reggie" Davis, from Laguna Nigel, who I've known for several years and whose charming and eclectic
HORSE AND MUSKET blog showcases his incredible collection of exquisitely well-painted 28mm figures, including Wars of the Roses, 18th Century Lace Wars, Napoleonics, ACW, Second Afghan War Anglo-Indian troops (a shared interest), plus various age-of-sail warships and WWI aircraft;
...and Michael's son William Davis, from San Diego, an active miniature and board gamer whose own interests run the gamut from historicals to Warhammer and who was kind enough to accompany his father up to my place. Michael and William had previously played The Sword And The Flame a couple of times on their own and enjoyed the rule system, which struck me as a good omen.
I asked William to join me as Afghan co-commander and assigned Matthew and Michael the British forces. Matthew -- with a lot more experience of the rules -- was given the overall commander role, with Michael as his vital sub-commander.
I had set out the Afghan regular Infantry and Artillery in their opening positions -- in accordance with the historical record -- the night before, but it understandably took a while for Matthew and Michael to finalize their plan of attack. Once they'd done so, the game commenced.
We used a mix of 20th Anniversary TSATF rules and the "Eight Hundred Fighting Englishmen" big-battle variant of the same, in order to speed play up as much as possible. TSATF is really meant for games of a smaller size and scope than this one, which pits just under 200 Anglo-Indian figures against just under 400 Afghan figures. The use of "Eight Hundred Fighting Englishmen" for movement and morale purposes allowed us to move a bit faster, while fire and melee conducted in the classic TSATF manner. Time-consuming though that may be, it also provides a steady supply of high-drama, with equal parts cheering and groaning, depending on the details.
The simple and straightforward OBJECTIVE of this scenario is for the British to TAKE UNDISPUTED POSSESSION OF THE TWO EXITS ROADS ON THE NORTH SIDE OF THE TABLE and for the Afghans to PREVENT THIS FROM HAPPENING.
In addition, the British must take care not to suffer a tremendous amount of casualties, as they need to advance up the road to Kabul with the troops they have on hand and enact vengeance for the recent murder of their Envoy Major Cavagnari and his escort of Guides.
The game started in very historically accurate fashion, with the British sending Major White's small "feint" attack force to attack the Afghan positions to the East, while General Baker's more substantial force moved against the weaker Afghan positions to the West.
Baker's troops got "stuck in" on the front slope of the "Red Ridge" located very close to their own starting positions, the 72nd Highlanders and 5th Gurkhas advancing and exchanging fire with the Afghan regular infantry occupying the front slope of this position. After taking some casualties the 72nd CHARGED the Afghans on the heights above them...
Three Afghan infantry units started the game atop the "Red Ridge" -- one broke after taking casualties from British infantry and artillery fire and ROUTED to the North, while the other two remained in place, one of them defending itself against the Highlander charge...
It was a touch-and-go melee but the ranks of the Highlanders had been thinned out by fire casualties and despite their bonus for being "CHARGING HIGHLANDERS" they still had to contend with their Afghan foes bonus for "DEFENDING HIGHER GROUND" and wound up on the losing side of the melee.
Meanwhile on the East side of the battlefield, the 92nd Highlanders and a detachment (10 figures with one Leader) of the 23rd BNI (Sikh Pioneers) together with a combined Squadron of the 5th Punjab Cavalry and 9th Lancers, one Field Gun and one Mountain Gun, advanced through the crop-fields to the West of Khairabad Swamp, towards Khairabad Village and the first of the two Conical Hills anchoring the Eastern end of the Afghan defensive position...
The British rifles and guns exhanged fire with a single unit of Afghan Regular Infantry occupying the first Conical Hill...
As the British continued to advance, 2 Clans of Tribesmen (2 x 20-figure units) popped up behind the walls of Khairabad Village and fired back at them, 15 of the 20 Afghan jezzails present being able to bring their weapons to bear on enemy targets from the behind the walls and atop the roofs...
Afghan Regular Artillery arrayed in the Gorge to the North and on the mountains just off to the West opened fire, inflicting a handful of casualties...
After the British guns prolonged down the road leading North to the Gorge, the 3rd and final Tribal Clan emerged from where they'd been hiding in the crop-fields alongside Khairabad Village and CHARGED THE FIELD GUN which was sitting in the middle of the road...
The British brought every available weapon to bear on the charging Tribesmen, including the Field Gun itself, and tearing the Tribesmen to pieces. When the time came for them to roll to CLOSE INTO COMBAT, they failed, turned and ROUTED up the road towards the Sang--i-Nawishta Gorge to the North...
Meanwhile, the 92nd Highlanders had themselves CHARGED the Tribal Clan holding the Gates of Khairabad Village. The Highlanders CLOSED but the Tribesmen FAILED their STAND AND FIGHT roll, turned and ROUTED out of the Village, across the irrigationi canal and North towards the same Gorge...
The last remaining Tribal Clan passed their STAND AND FIGHT roll and a melee ensued between them and the CHARGING HIGHLANDERS...
The Highlanders cut through the Tribesmen until the Clan Leader weighed into the battle with the "+1" modifier to his melee die and nearly turned the tide of the fight -- until he roled a "1" and the Highlander he was up against rolled a "6", and that as they say was the end of that.
At this point -- with things going the Brits way on their own right and a bit against them on their left, the action had to be postponed due to the lateness of the hour and the fact that one of the British commander and one of the Afghan commanders had substantial distances to drive home.
At the bottom of this post are some impressions made by and lessons learned from this game, but before getting to that, here's a ton-and-a-half of pictures showing the action as it unfolded on the tabletop...
First up... some residents of the Logar Valley enjoy the last few peaceful moments before General Frederick Roberts and his Kabul Field Force arrive...
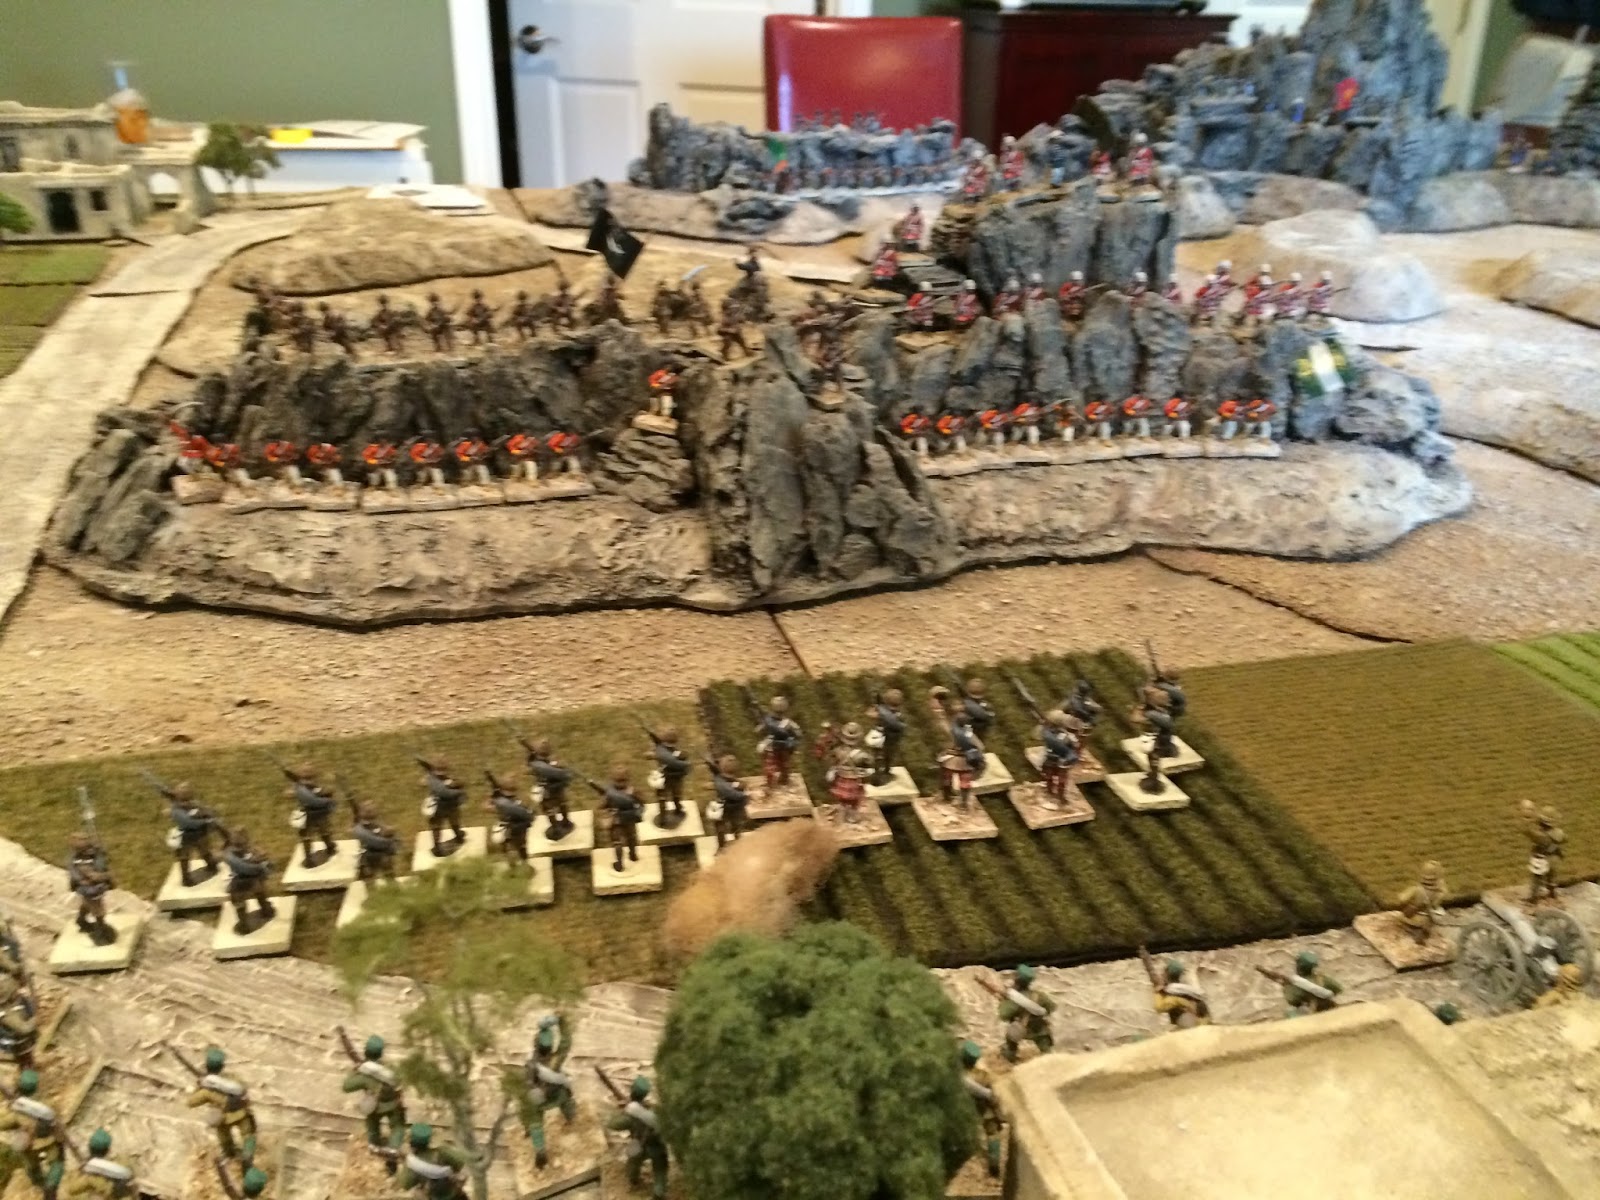
3 units of Afghan Regular Infantry occupy the "Red Ridge" at the start of the battle...
In BG another 2 units of Afghan Regular Infantry and 6 guns occupy the
Southern edge of the mountains that stand between the British and Kabul...
A closer view of local farmers, tending their orchard
and fields near the East bank of the Kabul River...
A chunk of General Baker's brigade -- 24 x 12th Bengal Cavalry,
40 x 72nd Highlanders, 20 x 5th Gurkhas, 20 x 5th Punjab Inf,
20 x 23rd BNI (Sikh Pioneers), 1 x Field Gun, 1 x Mt. Gun, 1 x Gatling Gun
First movement card of the game: Major Baker's Brigade on the British right...
Second movement card of the day: General Baker's brigade on the British left...
The ubiquitous D6 movement dice are rolled*...
(TSATF features variable movement rates)
View from the Afghan North of General Baker's brigade advancing
from the South towards the Western road to Kabul...
In the pics above and below featuring Matthew, you can see he's a faithful USC alumni and sports partisan, but this Saturday he was nice enough to forgo attending that game for this one. Of course, considering USC were up against the University of Idaho Vandals, there was likely to be much more thrilling drama on the wargaming table than the football field. In the event, USC defeated Idaho 59 - 9.
92nd Highlanders advancing on the East under command of Major White...
Just East of the Kabul River, General Baker's brigade takes up every available square inch on the British left...
A BLACK JOKER gives the Afghans a "BONUS" move...
View from atop the "Red Ridge" of approaching 72nd Highlanders...
Closer view of the 72nd and their comrades-in-arms -- and mountaineering -- the 5th Gurkhas...
No. 7 Company Bengal Sappers & Miners head North up the main road of Charasiab village towards the action...
Exchange of gunfire between Afghan regulars on the
heights and British troops in the crop-fields below...
First Troop of 12th Bengal Cav. skirt round the Western Spur
of the Red Ridge to avoid Afghan musketry to the East...
(Will they be met by AMBUSH...???)
Wider view of the developing action...
23rd BNI (Sikh Pioneers) in position behind the Gurkhas
and the 72nd, all arrayed in OPEN ORDER atop "Class II" cover
crop-fields, combining to bestow "CLASS III TARGET" status...
On the East side of the field, Afghan Regular Inf. in place atop the first of the two "Conical Hills"...
Afghan Regular Inf. unit BREAKS and ROUTES away General Baker's advance...
On the British right/Afghan left, Major White's
"Feint" brigade advances towards Khairabad Village...
On the mountaintops to the North, Afghan guns prepare to fire on Major White's command...
General Baker's advance continues...
The 72nd launch their CHARGE up the South slope of "Red Ridge"...
A pair of locals watch as the 12th Bengal Cavalry round the Western spur of
Red Ridge and ride towards the rear of Afghan troops occupying that key position...
(Where is your cousin"Mad Ghazi" Muhammed and his
white-robed, full-bearded buddies when you need them...?)
72nd Highlanders advance up the road between "Red Ridge" and its Western Spur...
Using a LASER POINTER to determine LINE OF SIGHT from shooter to target...
2 x Tribal clans POP UP in Khairabad Village to open fire on approaching 92nd Highlanders...
...who then shoot back...
"Pinned" = ROUTING...
"Charge" = CHARGE!
Major White pushes his small combined force of foot,
horse & guns North towards Khairabad Village...
The third and final clan belonging to the Tribal force in Khairabad
Village emerges to CHARGE the field gun down the road...
On the other side of the aisle -- and the road --
92nd Highlanders CHARGE into Khairabad village...
General Baker (Matthew) looks on as Major White (Michael)
launches the bayonets of the 92nd at Khairabad Village...
I use dirt-colored cotton balls to mark units as having moved...
12th Bengal Cav. occupy some crop-fields to the North of the "Red Ridge"...
Tribesmen emerge from Hindiki Village to open fire on the Bengal Cavalry to the South...
The "Blue Ghazis" fail to CLOSE INTO COMBAT
with 72nd Highlanders & ROUTE 4xD6 to the North...
Green and White Ghazis SUCCEED in CLOSING INTO
COMBAT with one Wing of the 72nd (a 20-fig. unit), Ghazi
BANNERS now visible all along the top of "Red Ridge"...
This was not good news for the 72nd. Having already taken
substantial casualties from Afghan Reg. Inf. fire, their ranks
were thin to stand against the dual Ghazi charges...
The melee went back-&-forth but in the end the Ghazis were too
much for the 72nd and it was Allah's Faithful, rather than
those of the Queen-Empress, who emerged victorious...
Action developing on the East...
The handful of survivors of the Tribal clan charging
the Gun (most were felled by fire en route)
FAIL TO CLOSE INTO COMBAT, turn and ROUTE...
Tribesmen ROUTING to the North...
The Field Gun counts its lucky stars for having avoided
any melee whatsoever with those bearded brutes...
But there were still left 2 largely intact clans of
Tribesmen occupying Khairabad Village...
Behind these troopers of the 5th Bengal Cav, the 92nd
Highlanders are CHARGING into Khairabad Village...
As the lead Clan of Tribesmen defending the village's
front gate ROUTED, the 92nd CHARGED on into the
second and third Clans inside the Village...
One STOOD AND FOUGHT, the other ROUTED...
The 92nd vs. Tribesmen melee resulted in a British victory
and the Highlanders took possession of Khairabad Village...
Survivors of the combined Squadron of 5th Punjab Cav.
and 9th Lancers reform at the Khairabad crossroads...
Survivors of three Tribal Clans routing North from Khairabad...
Back on the West side of the field, 5th Punjab Inf.
are backing up the 23rd BNI (Sikh Pioneers)
and the 72nd Highlanders in front of them...
British KIA...
The first of the two "Conical Hills" -- when the battle was
halted the unit occupying was leaderless & had suffered
over 50% casualties, making it near-certain it would route
in response to any attack, even 1 more casualty by fire...
The second "Conical Hill" -- occupied by 2
untouched Afghan Regular Infantry units)...
On the British right to the East, the 92nd hold Khairabad and the
Afghans on the Southern Conical Hill are about to be dislodged...
On the British left to the West, the Red & Green Ghazis,
having inflcited serious casualties onto & driven off
one Wing of the 72nd Highlanders, hold the "Red Ridge"
alongside 2 weakened units of Afghan Reg. Inf...
Dhoolie bearers bringing casualties from the fighting
around Khairabad across the irrigation canal bridge to
the Army Hospital Corps camp in front of Charasiab...
General Roberts receving a dispatch from one of his subordinate
commanders, delivered by a Sowar of the 5th Punjab Cavalry...
At this point, as mentioned above, we were forced to call the game, as evening was getting on and Michael and William needed to start their drive back home.
I believe the battle was at least halfway to completion, possibly much closer, depending on how things might have gone from that point on.
On the one hand it was frustrating to cut things short, but on the other we had all enjoyed the game for as far as it got, as well as each others company and a very good lunch, and I had learned a lot that hopefully will enable me to greatly improve the quality of the scenario, so all-in-all an extremely positive result.
If forced to adjudicate the results on the tabletop, I would say it was a DRAW.
The British had emerged victorious in the battle for Khairabad Village on the East and the Southern Conical Hill was one step from falling into their hands... but the Afghans had won the battle for the "Red Ridge" in the Centier/West. True, the Ghazis now occupying the ridge would be unable to bring any fire whatsoever to bear on the British as the British no doubt proceeded to blaze away at them with rifle, canon and Gatling Gun, but the Ghazis would probably launch yet another charge and inflict more casualties before being shot and/or cut to pieces.
The question would be, after that happened, whether or not the British forces still had enough troops left to wrest the northern-most heights from the Afghan Regular Infantry and Artillery waiting for them there.
The answer to that one would probably be "YES" as Afghan Regular Inf. and Art. are generally not the most reliable or potent of fighting forces... but it would depend on how heavy a toll the Ghazis would be able to inflict on General's Baker's brigade in connection with the two remaining but weakened Afghan Regular Infantry units atop the "Red Ridge".
I haven't cleared the remnants of the game away yet, so Matthew and I may yet attempt to play the rest of the game through to completion, or I may try to do it myself, playing both sides in Solo-Wargaming style.
There's a long list of things I learned from this play-test, but the first and most important one is:
(1) I need to more severely LIMIT THE NUMBER OF UNITS ABLE TO OCCUPY TERRAIN PIECES.
In my Maiwand game this really was not an issue, as the only terrain was the three nullahs dug out of the ground and the Gorge they connected to, all of which served like a trench system. Counting as many figures as could physically stand inside the nullahs and gorge as OCCUPYING the nullahs and gorge was not a problem.
But in this game, the question of how many units can occupy a hill at one time -- and whether or not additional friendly units can move through them to attack the enemy -- can easily play a key role.
I think I allowed TOO MANY AFGHAN UNITS to occupy the "Red Ridge" -- three regular infantry units of 20 figures each at the start of the game, and then an additional two Ghazi units as the game proceeded.
Although in keeping with classic TSATF style of play, I made sure all the figures could physically FIT IN THE AVAILABLE SPACE, because this game is being played at a Tactical -- perhaps even Grand Tactical or Operational -- level, I think I must change it up. Maybe the rule for the Red Ridge will be a maximum of THREE UNITS from the same side at any one time, with no allowance for moving additional friendly units through their ranks. Additional enemy units can of course try to FIGHT THEIR WAY onto the same hill, with the same limit of a maximum of THREE UNITS at once.
If this rule had been in place the Ghazis would not have been able to cuse the CLASS III cover of the hillside to launch their CHARGE at the 72nd Highlanders. Instead they would have had to charge down the open road, which would have made them a much easier to hit CLASS I TARGET. If the Red Ridge had not been occupied by 2 Afghan Regular Infantry units, it would have been a different story and I would have no problem with the Ghazi charge, but the way it worked out seemed like just too much over-stuffing of troops into one terrain piece.
I'll come up with UNIT CAPACITIES for each hill on the table and use them in the next play-test.
(2) In order to more severely limit Afghan command and control, I am thinking about having the Afghan units that start the game occupying "Red Ridge" and the two "Conical Hills" all count as being "OUT OF COMMAND". This is a key rule in the "Eight Hundred Fighting Englishmen" rules. Any units more than 12" from their MOUNTED COMMANDER (General, Mullah, etc.) must roll a D6 in order to move and if it results in a 5 or 6, they cannot move at all, though they can still change facing or formation and may fire without penalty.
This would actually represent the behavior of the Afghan troops in those positions very well, as they never advanced, and in fact the Afghan commander and his associated generals were all on the high ground at the Northern edge of the battlefield, rather than in place atop the Red Ridge or either of the Conical Hills.
I may also adjust the rule so the Afghans us it as-is but British units only count as being "Out of Command" if and when they roll a 6, instead of a 5 or 6.
Don't get me wrong -- I have no interest in stacking the deck so the British always win this game -- my only interest is in balancing the deck so both sides have an equal chance to win, and I think this adustment will help me move towards that aim.
Also, British command-and-control at Charasiab was incredibly smooth and well-handled, while Afghan command-and-control was not. In fact, if the Afghans had done better on that front, the results could have been dramatically different and Roberts might never have reached Kabul at all.
I came up with another idea re: the "In Command" rule, which involves HELIOGRAPHS...
After the real Battle of Charasiab, both General Roberts and Brigadier Baker wrote about how useful heliograph teams had been in enabling them to exercise effective command and control throughout the battle.
I own one of the gorgeous Perry Miniatures Sudan range Heliograph teams (though it's not yet painted), as well as two or three old Hinchcliffe Heliograph teams (badly painted many decades ago, but still usable!), and for some time now I've been pondering how I could possibly work miniature heliographs into game-play itself, without success... until now.
After the game ended it crossed my mind... what if I used a pair of heliograph teams arranged like vignettes on round bases... one on the East with Major White and one on the West with Brigadier Baker... and so long as they remain WITHIN THE 12" COMMAND RADIUS of their Mounted Commander, the heliograph is able to RELAY HIS COMMANDS UP TO AN ADDITIONAL 12", thereby extending Command Radius of the General.
It won't work if LINE OF SIGHT from the Mounted Commander to the Heliograph Team is blocked by intervening terrain.
Enemy troops cannot purposefully target the heliograph team with fire or melee (as it would simply retreat away from the threat) BUT if the Heliograph Team is located within 4" of a friendly unit that takes FIRE or MELEE casualties, it will be AT RISK of being destroyed. Real heliograph teams were so small that in the scale this scenario is being played at -- 1 FIGURE = 15 MEN -- a single hit would be enough to put the entire team out of action. So... if the British player risks allowing his Heliograph Team to be close enough to the action to potentially take casualties... he will roll a D6 and if it's a THREAT FROM FIRE and he gets a 6, the team is destroyed, and if it's a THREAT FROM MELEE and he gets a 5 or a 6, the team is destroyed.
(3) BRITISH SET-UP: one other issue was the British players "move on" of all their units. I started the game with the Britsh forces off-table and had them move on during the first turn. In theory this struck me as perfectly appropriate, as the ground covered by the table was mostly occupied by the Afghans and the British and Indian forces advanced into it from the South, represented by the Southern edge of the tabletop.
But as was pointed out by William and Matthew and Michael -- pretty much EVERYONE -- in practice this resulted in the British players juggling moving on unit after unit, back-and-forth and somewhat piecemeal.
I agree with them completely and think it will be much to allow the British players to simply SET-UP ALL THEIR FORCES ON THE TABLE anywhere between the Kabul River on the West side and the Khairabad Swamp on the East side and up to 12' DEEP towards the North side of the table.
This will allow the British commanders to coordinate their initial deployments, which in fact they were able to do in the real battle, as the Afghans did not advance far enough South to interupt or interfere with the initial British advance. This will also allow the British to occupy Charasiab Village if they so desire, lining troops along the rooftops to bring fire onto the Afghan regular atop the "Red Ridge". Doing so will result in tying down a chunk of British troops who would probably be better employed advancing towards their objectives on the far side of the table, but that will be up to the British players to decide.
I also plan to have THREE BRITISH PLAYERS rather than two. Of course there were only two available to me on this day, but General Baker's brigade is certainly big enough to split up into two component parts, and this will allow the overall commander to take on the role of General Roberts (even though in reality Roberts was with his HQ staff at the British camp South of Charasiab, along with his reserves -- but I'm hoping to get this game into balance without making use of the reserves, which I think could simply clog up the table with too many British and Indian troops).
That's it for now. I'm slammed with work at the moment but I really want to make some custom unit stat sheets for the next play-test, so it will be easier and more convenient for all players present to know what's going on, as in this case we had to keep switching between rule-books and Reference Charts from the two related but still distinct rules sets (TSATF and Eight Hundred Fighting Englishmen).
Last but not least I'd like to say a very sincere THANK YOU to William, Michael and Matthew for spending the better part of the day with me on this project and helping make it possible for me to improve it a great deal.