Blogging in the time of coronavirus.
This post is about prepping for a big game that I've been planning to play towards the end of Summer with a bunch of friends from here in LA, around the nation, and possibly one or two from around the world. Hopefully by then daily life and travel will have returned to normal.
Since I started writing it more than two months ago, circumstances have changed. I assume everyone reading this is experiencing slight variations of the same situation. My friends who are medical professionals are dealing with a very different set of circumstances, and if you are one of them, all I can say is THANK YOU, GODSPEED, and I hope and pray you remain well while continuing your vital work.
So my son's office closed and he is now working remotely from home. My older daughter cancelled her Spring Break trip overseas and came home instead, then stayed here when West Point cancelled in-person classes & training. My younger daughter's high school cancelled in-person classes. So, along with my wife, the 5 of us are home together, all working or attending school remotely. Lucky for us our house is not too small and we get along well enough for this not to cause real problems for the foreseeable future, and beyond that if need be. We've been communicating with relatives and friends around the country and the world, hoping everyone weathers the current coronavirus storm for as long as it lasts. We're concerned for my mom, who will turn 80 in a couple of months, but thankfully remains in good health and has been taking the appropriate precaution of staying home. I feel bad for my younger daughter and youngest child who is a senior in her last year of high school. She has busted her behind all through school and earned the right to enjoy the perks of being a senior, most of which happens in this second half of senior year. Now it is possible, even probable, that her senior prom and even graduation will be cancelled. These events come only once in a lifetime, and while it's not a traumatic injury or the end of the world, it is definitely a bummer. But thankfully she and the rest of us remain in good health, for which I am extremely thankful.
I've been very busy with work, for which I'm also thankful, but the down-side is it's led me to delay getting this blog post ready. Finally I forced myself to finish it, partly because it seems like an act of normalcy in an increasingly abnormal time. Though my three children might disagree, I am a calm and reasonable person, and among the last to overreact to events. In the current environment carrying on requires some adjustments to routine, but we can deal. As an illustrious allied nation used to say, keep calm and carry on.
Meanwhile in this humble little corner of the inter webs I have unfortunately not been able to solve my blog administration problems. I remain unable to leave a comment here on my own blog, unable to delete the myriad junk-bot comments deposited on posts (most of which come from India and the Czech Republic, probably due to my business travels the past couple of years), and usually unable to leave comments on other blogs. It's frustrating, but on the bright side at least I'm still able to post and edit material. And so... I blog on!!!
The Vauban fortress system and accompanying field-works which I posted about over the past few months -- 57 pieces in all -- were packed up and shipped to the Great White North, aka: Canukistan, aka: Canada. I'm very happy to report they all arrived safe & sound at their owner's doorstep. He seemed like a pretty happy Expat American/transplanted Canadian.
So I turn the page in my hobby book back to late 19th Century Afghanistan...
As mentioned above, in mid-August of this coming Summer, I plan to host a game to commemorate the upcoming 140th anniversary of the battle of Kandahar, AKA: the battle of Baba Wali, fought on September 1st 1880.
The battle featured one of the largest British armies of the war, more than ten-thousand British and Indian troops under the command of General Frederick Roberts, versus some twelve to fifteen-thousand Afghans, led by Ayub Khan. It was a British attack on prepared Afghan defensive positions which resulted in a major British victory and turned out to be the last major action of the Second Afghan War.
The battle was fought just one day after Roberts and his army arrived at Kandahar, having completed their soon-to-be-legendary August 8th to 31st march from "Kabul To Kandahar".
The march was triggered by Ayub Khan's defeat of Brigadier General George Burrows' combined arms brigade at the Battle of Maiwand in the Helmand Valley on July 27th 1880. The British and Indian survivors had retreated through the night 40 miles to arrive at the city of Kandahar. They joined the garrison which was surrounded and put under siege by Ayub Khan's victorious army a few days later.
Upon hearing of the disastrous defeat Roberts was ordered to lead a relief force from Kabul to Kandahar and also to seek out and defeat Ayub Khan. They simultaneously ordered Major-General Robert Phayre to do the same, leading another relief force from Quetta. As events proceeded, Roberts and his men reached Kandahar first and engaged Ayub Khan and his army in battle the very next day.
Just prior to the arrival of Roberts relief force, Ayub Khan had lifted the siege and repositioned his army to the North-West, between a line of towering rocky hills and the Arghandab River, giving them a very strong defensive position vis-a-vis any attack launched from the direction of the city, where he knew Roberts and his army were about to arrive.
This set the table for the battle to come, pitting some of the best battle-tested regiments of the British and Bengal armies (hand-picked by Roberts for this operation) against Ayub Khan's mix of Afghan regulars, Tribesmen, and Ghazi fanatics, who only weeks before had achieved a resounding victory over the British at Maiwand, which ended with the remnants the British force routing off the field, and leaving two of their guns behind to fall into enemy hands.
But the army Ayub Khan would face at Kandahar a month after his glorious victory at Maiwand would be very different from the one he had previously defeated.
Burrows army at Maiwand had been the size of a small brigade, outnumbered by close to ten-to-one odds in men, severely out-gunned in both number and quality of artillery, and operating over ground they had not previously scouted.
Just as important was the difference in Ayub's opposing commander. Neither Burrows nor his second in overall command and cavalry commander Brigadier General Thomas Nuttall, had recent experience commanding troops in battle. The last time either hand done so was two decades prior, in the role of junior officers during the Indian Mutiny. Since then Burrows had mostly served as a staff officer, Nuttall as a military policeman and administrator. Neither had ever led combined arms in combat. Roberts on the other hand had spent the past two years leading combined forces of British and Indian infantry, cavalry, and artillery to victory over their Afghan opponents in major actions at Peiwar Kotal, Charasiab, and the defense of Kabul's Sherpur Cantonments.
It appears Ayub himself realized the situation had changed, as he tried to make peace with the British, sending a letter to Roberts while the General and his army were camped at Robat, just two days before arriving at Kandahar. In it Ayub explained how he had not wanted to fight the British at Maiwand but been forced to do so against his will by their own ill-advised advance into his territory. Now he wanted to put the unfortunate event behind him and ally with the British to bring peace back to Afghanistan.
Needless to say, General Roberts was not keen on Ayub's plan. He sent a terse reply advising the Afghan prince to release the prisoners he'd taken at Maiwand (including Lieutenant Hector MacLaine of the Royal Horse Artillery) and unconditionally surrender.
Equally needless to say, Ayub Khan was not keen on Roberts' plan either.
After their 23 day, 313 mile march from Kabul, Roberts and his Field Force arrived at Kandahar on August 31st. He took immediate command of the 4,000+ garrison that had spent the past month under siege, gathered all available intelligence on the numbers and positions of Ayub's forces, decided how best to fight them, and issued orders readying his army to do so the next day.
THE BATTLEFIELD TERRAIN:
To the West of the city of Kandahar lay a line of razor-back rocky hills, which Ayub occupied with his army. It was traversed by one pass wide enough for a real road. This pass was known as the BABI WALI KOTAL.
On the Western side of the rocky hills, between the Kotal and the nearby Arghandab River, was the village of Baba Wali.
Farther North was the Murza Kotal (also called "Mirza" or "Marza") -- a second, narrower, pass through the rocky hills.
Towards the Southern end of the rocky hill line, between it and Kandahar, were a pair of villages:
Gundi Mulla Sahibdad lay directly to the West of the city.
Gundigan was equally West and further South of the city.
The land surrounding these two villages was filled with WALLED GARDENS & ORCHARDS and crisscrossed by IRRIGATION CANALS (called "Karez" in Pashto).
Continuing West, on the far side of the rocky hill Line, near its Southern tip, lay another rocky hill, and nestled at its base another village:
Pir Paimal.
When Roberts and his Kabul-Kandahar Field Force reached the vicinity of Kandahar, Ayub Khan's army had just abandoned their siege of the city, occupied and in some cases entrenched all of these positions, creating a very strong defensive line from which to resist a British advance. The only weakness of this new position was that it left the Afghans with their backs to the Arghandab River. But though this section of the river had no bridges, it featured 3 fords, spread rather evenly from one end of the coming battlefield to the other, with the Northern-most ford in line with the Babi Wali Kotal road.
Ayub's army was reported to include 4,800 regular infantry & artillery serving 32 guns, and 8,000 irregular Tribesmen and Ghazi religious fanatics. Some sources (including Roberts' autobiography) also mention 2,000 regular cavalry. Is that 2,000 additional "Afghan regulars" or were those 2,000 cavalry troopers already included in the 4,800 "regulars" count? I don't really know. I also found one contemporary reference to 3,000 Afghan cavalry. Does that mean there were 2,000 regular sowars plus another 1,000 tribal horse? One month earlier Ayub Khan's army at Maiwand included 3,000 Jamshidi & Kohistani tribal horse and 1,000 Kabuli regular cavalry AKA: "sowars". It's certainly possible another 1,000 regular cavalry rode to join his victorious ranks, and it's also possible that a large portion of the mounted tribesmen who survived the Battle of Maiwand left for home with booty (perhaps including the regimental colours of the 66th Berkshires), tales of glory, and the bodies of their comrades who hadn't been so lucky.
Beyond those suppositions there's nothing to go on -- except for the numbers of Afghan regular and irregular cavalry I have in my collection, and also the fact that I have yet to read any mention Afghan cavalry of any sort taking an active part in the battle in any contemporary or later report. So if any Afghan regular cavalry were there -- and it seems probable there were at least the 2,000 troopers specifically mentioned by Roberts himself -- maybe they were held in reserve and at some point chose to withdraw from the field without having had any involvement in the battle.
Much more specific and definite information is available on General Roberts' army. As mentioned above it was one of the largest assembled during the war. On the day of the battle he had 8,400 of troops who had marched from Kabul with him, plus 4,110 men of the Kandahar garrison, whom he had just relieved from their month-long besiegement.
Here's a sketch of the battlefield as seen from the high ground South-East of Gundigan village, drawn by Capt. Frederick Thomas Nelson Spratt of the Royal Engineers, who served as Deputy Assistant Quartermaster General for the Kabul-to-Kandahar Field Force:


For anyone interested...
"The Second Afghan War, 1878-1880, Official Account" by India Army Intelligence Branch
*** *** ***
For a LINK to a collection of ARTWORK & OLD PHOTOS showing c.19th Kandahar and its environs, CLICK HERE to visit the Pashtun Culture and History blog
*** *** ***
Whew!
And now -- finally -- just how do I plan to game this dang battle?
That's a lot to cover:
-Terrain layout.
-Orders of Battle -- and the troops to go with them.
-Scenario & Victory Conditions -- and any "special rules" to go with them.
After this veeeeerrrrrrry long opening chapter, I will space out the above over the coming days & weeks hopefully leading up to the arrival of a bunch of good friends and gaming comrades from almost all points of the compass for the game itself in the middle of August. Please G-d it will work out that
But before signing off I will share my initial thoughts on the ORDERS OF BATTLE...
NEXT UP: Some pics of the embryonic terrain layout, including some useful discoveries on my part while going back-and-forth between the primary sources and the tabletop terrain, while fine-tuning the layout...
PS. Anyone out there with additional info, comments or corrections -- especially corrections! -- I implore you to leave a comment below!
PPS. Changing subjects back to the worldwide COVID-19 crisis, I wish you & your friends and family good health and fortitude, and again for those of you in the medical profession, THANK YOU and G-d willing stay safe.
This post is about prepping for a big game that I've been planning to play towards the end of Summer with a bunch of friends from here in LA, around the nation, and possibly one or two from around the world. Hopefully by then daily life and travel will have returned to normal.
Since I started writing it more than two months ago, circumstances have changed. I assume everyone reading this is experiencing slight variations of the same situation. My friends who are medical professionals are dealing with a very different set of circumstances, and if you are one of them, all I can say is THANK YOU, GODSPEED, and I hope and pray you remain well while continuing your vital work.
So my son's office closed and he is now working remotely from home. My older daughter cancelled her Spring Break trip overseas and came home instead, then stayed here when West Point cancelled in-person classes & training. My younger daughter's high school cancelled in-person classes. So, along with my wife, the 5 of us are home together, all working or attending school remotely. Lucky for us our house is not too small and we get along well enough for this not to cause real problems for the foreseeable future, and beyond that if need be. We've been communicating with relatives and friends around the country and the world, hoping everyone weathers the current coronavirus storm for as long as it lasts. We're concerned for my mom, who will turn 80 in a couple of months, but thankfully remains in good health and has been taking the appropriate precaution of staying home. I feel bad for my younger daughter and youngest child who is a senior in her last year of high school. She has busted her behind all through school and earned the right to enjoy the perks of being a senior, most of which happens in this second half of senior year. Now it is possible, even probable, that her senior prom and even graduation will be cancelled. These events come only once in a lifetime, and while it's not a traumatic injury or the end of the world, it is definitely a bummer. But thankfully she and the rest of us remain in good health, for which I am extremely thankful.
I've been very busy with work, for which I'm also thankful, but the down-side is it's led me to delay getting this blog post ready. Finally I forced myself to finish it, partly because it seems like an act of normalcy in an increasingly abnormal time. Though my three children might disagree, I am a calm and reasonable person, and among the last to overreact to events. In the current environment carrying on requires some adjustments to routine, but we can deal. As an illustrious allied nation used to say, keep calm and carry on.
Meanwhile in this humble little corner of the inter webs I have unfortunately not been able to solve my blog administration problems. I remain unable to leave a comment here on my own blog, unable to delete the myriad junk-bot comments deposited on posts (most of which come from India and the Czech Republic, probably due to my business travels the past couple of years), and usually unable to leave comments on other blogs. It's frustrating, but on the bright side at least I'm still able to post and edit material. And so... I blog on!!!
The Vauban fortress system and accompanying field-works which I posted about over the past few months -- 57 pieces in all -- were packed up and shipped to the Great White North, aka: Canukistan, aka: Canada. I'm very happy to report they all arrived safe & sound at their owner's doorstep. He seemed like a pretty happy Expat American/transplanted Canadian.
So I turn the page in my hobby book back to late 19th Century Afghanistan...
BABA WALI +140
As mentioned above, in mid-August of this coming Summer, I plan to host a game to commemorate the upcoming 140th anniversary of the battle of Kandahar, AKA: the battle of Baba Wali, fought on September 1st 1880.
The battle featured one of the largest British armies of the war, more than ten-thousand British and Indian troops under the command of General Frederick Roberts, versus some twelve to fifteen-thousand Afghans, led by Ayub Khan. It was a British attack on prepared Afghan defensive positions which resulted in a major British victory and turned out to be the last major action of the Second Afghan War.
The battle was fought just one day after Roberts and his army arrived at Kandahar, having completed their soon-to-be-legendary August 8th to 31st march from "Kabul To Kandahar".
The march was triggered by Ayub Khan's defeat of Brigadier General George Burrows' combined arms brigade at the Battle of Maiwand in the Helmand Valley on July 27th 1880. The British and Indian survivors had retreated through the night 40 miles to arrive at the city of Kandahar. They joined the garrison which was surrounded and put under siege by Ayub Khan's victorious army a few days later.
Upon hearing of the disastrous defeat Roberts was ordered to lead a relief force from Kabul to Kandahar and also to seek out and defeat Ayub Khan. They simultaneously ordered Major-General Robert Phayre to do the same, leading another relief force from Quetta. As events proceeded, Roberts and his men reached Kandahar first and engaged Ayub Khan and his army in battle the very next day.
Just prior to the arrival of Roberts relief force, Ayub Khan had lifted the siege and repositioned his army to the North-West, between a line of towering rocky hills and the Arghandab River, giving them a very strong defensive position vis-a-vis any attack launched from the direction of the city, where he knew Roberts and his army were about to arrive.
This set the table for the battle to come, pitting some of the best battle-tested regiments of the British and Bengal armies (hand-picked by Roberts for this operation) against Ayub Khan's mix of Afghan regulars, Tribesmen, and Ghazi fanatics, who only weeks before had achieved a resounding victory over the British at Maiwand, which ended with the remnants the British force routing off the field, and leaving two of their guns behind to fall into enemy hands.
But the army Ayub Khan would face at Kandahar a month after his glorious victory at Maiwand would be very different from the one he had previously defeated.
Burrows army at Maiwand had been the size of a small brigade, outnumbered by close to ten-to-one odds in men, severely out-gunned in both number and quality of artillery, and operating over ground they had not previously scouted.
Just as important was the difference in Ayub's opposing commander. Neither Burrows nor his second in overall command and cavalry commander Brigadier General Thomas Nuttall, had recent experience commanding troops in battle. The last time either hand done so was two decades prior, in the role of junior officers during the Indian Mutiny. Since then Burrows had mostly served as a staff officer, Nuttall as a military policeman and administrator. Neither had ever led combined arms in combat. Roberts on the other hand had spent the past two years leading combined forces of British and Indian infantry, cavalry, and artillery to victory over their Afghan opponents in major actions at Peiwar Kotal, Charasiab, and the defense of Kabul's Sherpur Cantonments.
It appears Ayub himself realized the situation had changed, as he tried to make peace with the British, sending a letter to Roberts while the General and his army were camped at Robat, just two days before arriving at Kandahar. In it Ayub explained how he had not wanted to fight the British at Maiwand but been forced to do so against his will by their own ill-advised advance into his territory. Now he wanted to put the unfortunate event behind him and ally with the British to bring peace back to Afghanistan.
Needless to say, General Roberts was not keen on Ayub's plan. He sent a terse reply advising the Afghan prince to release the prisoners he'd taken at Maiwand (including Lieutenant Hector MacLaine of the Royal Horse Artillery) and unconditionally surrender.
Equally needless to say, Ayub Khan was not keen on Roberts' plan either.
After their 23 day, 313 mile march from Kabul, Roberts and his Field Force arrived at Kandahar on August 31st. He took immediate command of the 4,000+ garrison that had spent the past month under siege, gathered all available intelligence on the numbers and positions of Ayub's forces, decided how best to fight them, and issued orders readying his army to do so the next day.
THE BATTLEFIELD TERRAIN:
To the West of the city of Kandahar lay a line of razor-back rocky hills, which Ayub occupied with his army. It was traversed by one pass wide enough for a real road. This pass was known as the BABI WALI KOTAL.
On the Western side of the rocky hills, between the Kotal and the nearby Arghandab River, was the village of Baba Wali.
Farther North was the Murza Kotal (also called "Mirza" or "Marza") -- a second, narrower, pass through the rocky hills.
Towards the Southern end of the rocky hill line, between it and Kandahar, were a pair of villages:
Gundi Mulla Sahibdad lay directly to the West of the city.
Gundigan was equally West and further South of the city.
The land surrounding these two villages was filled with WALLED GARDENS & ORCHARDS and crisscrossed by IRRIGATION CANALS (called "Karez" in Pashto).
Continuing West, on the far side of the rocky hill Line, near its Southern tip, lay another rocky hill, and nestled at its base another village:
Pir Paimal.
When Roberts and his Kabul-Kandahar Field Force reached the vicinity of Kandahar, Ayub Khan's army had just abandoned their siege of the city, occupied and in some cases entrenched all of these positions, creating a very strong defensive line from which to resist a British advance. The only weakness of this new position was that it left the Afghans with their backs to the Arghandab River. But though this section of the river had no bridges, it featured 3 fords, spread rather evenly from one end of the coming battlefield to the other, with the Northern-most ford in line with the Babi Wali Kotal road.
Ayub's army was reported to include 4,800 regular infantry & artillery serving 32 guns, and 8,000 irregular Tribesmen and Ghazi religious fanatics. Some sources (including Roberts' autobiography) also mention 2,000 regular cavalry. Is that 2,000 additional "Afghan regulars" or were those 2,000 cavalry troopers already included in the 4,800 "regulars" count? I don't really know. I also found one contemporary reference to 3,000 Afghan cavalry. Does that mean there were 2,000 regular sowars plus another 1,000 tribal horse? One month earlier Ayub Khan's army at Maiwand included 3,000 Jamshidi & Kohistani tribal horse and 1,000 Kabuli regular cavalry AKA: "sowars". It's certainly possible another 1,000 regular cavalry rode to join his victorious ranks, and it's also possible that a large portion of the mounted tribesmen who survived the Battle of Maiwand left for home with booty (perhaps including the regimental colours of the 66th Berkshires), tales of glory, and the bodies of their comrades who hadn't been so lucky.
Beyond those suppositions there's nothing to go on -- except for the numbers of Afghan regular and irregular cavalry I have in my collection, and also the fact that I have yet to read any mention Afghan cavalry of any sort taking an active part in the battle in any contemporary or later report. So if any Afghan regular cavalry were there -- and it seems probable there were at least the 2,000 troopers specifically mentioned by Roberts himself -- maybe they were held in reserve and at some point chose to withdraw from the field without having had any involvement in the battle.
Much more specific and definite information is available on General Roberts' army. As mentioned above it was one of the largest assembled during the war. On the day of the battle he had 8,400 of troops who had marched from Kabul with him, plus 4,110 men of the Kandahar garrison, whom he had just relieved from their month-long besiegement.
Here's a sketch of the battlefield as seen from the high ground South-East of Gundigan village, drawn by Capt. Frederick Thomas Nelson Spratt of the Royal Engineers, who served as Deputy Assistant Quartermaster General for the Kabul-to-Kandahar Field Force:

Some contemporary illustrations of the Kabul-to-Kandahar march:
9th Lancers on the line of march:
9th Lancers on the line of march:

"CROSSING THE ZAMBURAK KOTAL" from a painting by the Chevalier Desanges. Sadly I've never seen this image in color, despite it being an oil painting by a known British war artist (of French descent!). It's last known resting place was hanging in the Staff Canteen of the Royal Military College of Science, in Shrivenham, Oxfordshire. From 2004 to 2009 the College was amalgamated into a number of other UK defense institutions, the last of which ceased to exist in 2015. I haven't been able to learn what's become of the painting since then. If anyone reading this post does know, I would be very grateful for the information! Also, if anyone has access to a color version of the artwork that you can share, that would be greatly appreciate as well:


This one shows the 92nd Highlanders and 2nd Gurkhas (note red & white diced bands on their caps) fighting off an attack during the march:

I have seen this last one described as showing Roberts' arrival at the outskirts of Kandahar, but if accurate it must show the arrival of General Primrose's brigade much earlier in the war, since it contains a limbered Field or Horse Artillery gun, while General Roberts made a point of only bringing only Mountain Batteries transported by mule. Perhaps it's just an "artist's impression":

Some illustrations of the battle itself:
The 72nd Highlanders (in trews, except for the pipers) fighting in the village of Gundigan, led by what appears to be their regimental CO, Lt. Colonel Francis Brownlow, who was Killed In Action after leading his unit out the other end of Gundigan and into the walled orchards and "karez" watercourses that crisscrossed the ground between it and the village of Pir Paimal to the West, on the other side of the rocky ridge:

The 92nd Highlanders (in trademark kilts) storming the village of Gunda Mullah Sahibdad:

The same action portrayed in Richard Caton Woodville, Jr.'s "Kandahar: The 92nd Highlanders & 2nd Goorkas storming Gaudi Mullah Sahabdad":
(*If you look closely you can see a khaki clad Gurkha on the rooftop of the center building)

The 9th Lancers charging after Tribal fighters or Ghazis as they route across the Arghandab River:

Colonel E.A.P. Hobday's painting of 2nd Gurkhas and 92nd Highlanders attacking Afghan guns beyond Pir Primal, Sepoy Inderbir Lama of 2nd Gurkhas who was said to have claimed one of the 2 Afghan guns by shouting in Hindustani, "This gun belongs to my regiment--2nd Gurkhas, Prince of Wales's!" and covering its muzzle with his hat:

French artist Henry Louis Dupray's illustration of General Roberts on horseback alongside British Infantry and Indian Cavalry. Roberts spent most of the battle waiting with his reserve 3rd Division, which included the 2nd Battalion, 60th Rifles. As a rifle regiment they would've worn black leather equipment, but such details are often mistaken in artwork. It's also possible the British Infantry are meant to be troops from one of the British Infantry regiments in the Bombay Division, such as the 66th or 7th Fusiliers, both of whom would have worn white leather equipment, but would probably have been in khaki uniforms rather than the dark -- line infantry RED or rifle GREEN - uniforms they appear to wear in this black-&-white illustration. Unfortunately I've never seen a color version of this piece, and if anyone on the web has, I would greatly appreciate a chance to see it:

A war artist sketch from The Graphic showing British troops atop the Baba Wali Kotal watching the Afghan army route across the Arghandab River to the West. Amongst them can be seen kilted members of the 92nd Highlanders and soldiers of the 72nd Highlanders in trews, as well as Indian Infantry, Cavalry (a dismounted Sowar catching his breath) and Mountain Artillery:

The same sketch colorized back in the day, albeit not that accurately:

William Sketch Cumming's 1894 watercolor with pencil underdrawing, showing Drummer Roddick of the 92nd Highlanders, saving the life of Lieutenant Menzies during hand-to-hand fighting in Gunda Mullah Sahibdad Village:

Sikh Orderly covering General Roberts at Battle of Kandahar:
(based on the look of Roberts' helmet, this was probably painted years later)

The image of victory -- members of the various Bengal regiments that took marched 313 miles in a 23 days and defeated Ayub Khan and his army the next day:

Simple but useful Battle of Kandahar map from the ever-reliable British Battles website:

BRITISH & INDIAN REGIMENTS PRESENT AT THE BATTLE:
4th Gurkhas (note khaki uniforms, puttees & pillbox caps):

2nd Gurkhas in camp on the march from Kabul to Kandahar (note white leggings and red & white diced band on base of cap):

3rd Punjab Cavalry (1890):

3rd Bengal Cavalry (Skinner's Horse) 1910:

Central India Horse in a B&W sketch. My research shows they seem to have worn drab/khaki uniforms with a red cummerbund and dark blue turban with yellow and white stripes at one end:

And a color plate of a Sowar of the Central India Horse from 1893:

And finally an A.C. Lovett color painting of the Central India Horse (1911):

Havildar, Central India Horse c.1886:


The Tragedy of Lt. Hector Maclaine
Hector Maclaine was a Lieutenant, in command of a section of 2 guns of 1st Battery 2nd Brigade Royal Horse Artillery. On July 27th at Maiwand he ran up his guns to engage the Afghan army as it passed in the distance across the front of Burrows' Brigade, initiating the battle. When the battle ended he'd been taken prisoner. He was treated roughly at first but that changed when he was taken into custody by Ayub Khan, who fed him and gave him a small tent and may have had his minor wounds treated.
While Ayub & his army were besieging Kandahar, an attempt was made by senior Political Officer Colonel Oliver St. John to negotiate a prisoner exchange for the son of one of Ayub's high-ranking commanders, but the talks failed.
On September 1st, when victorious British troops reached Ayub's camp they found Maclaine's still warm dead body with his throat freshly slit so deeply his head was nearly severed.
The story later pieced together from several Indian army prisoners and one of Ayub's officers was that the Afghan Sirdar left instructions for the prisoners to be released (maybe out of humanity; maybe because he knew he'd been severely defeated and didn't want to give his victorious British adversaries yet another reason to chastise him; maybe a mix of the two) and that this had been done by the Regular troops who'd been minding the prisoners. But no sooner had they released them than a band of Ghazis routing from the advancing British army towards the Arghandab River, ran through the camp, crossed paths with the prisoners and murdered MacLaine. In his tent they found a scrap of paper on which he'd kept this brief diary in pencil:

Lieutenant Hector Maclaine was three months short of his 29th birthday when he died.

Needless to say, Hector Maclaine's story is a tragic one. I've been very familiar with it for the past decade, since researching my original Maiwand Day game For a while I have considered adding a sub-plot to the battle, giving the British a chance to rescue Maclaine before his tragic fate befalls him. I have a figure converted Hector Maclaine prisoner figure on my desk, and he is ver close to completion. Then all I have to do is get him painted. With a little luck his 28mm alter ego will manage to survive.
BATTLE OF KANDAHAR TERRAIN...
Some more recent photos of the battlefield:


The Arghandab River, at the Afghan army's back during the battle:

PERIOD PHOTOGRAPHS OF THE TERRAIN:


Description for the above photo:

Perhaps the most intriguing of these photos taken soon after the battle is this one, labelled "Baba Wali Kotal showing position of Ayub's guns":

To me it looks like it was taken facing North-West, from the East side of the Kotal, where the Anglo-Indian forces advanced. There's a body of water in the foreground and what exactly is that building that seems to have 16 doors and a low dome in the middle of the picture? A shrine? Could it be a small mosque? Though most mosques have have minarets, not all do, & the Koran doesn't require them to.
If you look closely at the ground between the domed roof and the towering rocky ridge above, you can see what appear to be entrenchments. This supports my interpretation of some of the written description of the Afghan positions, which I had already laid out on the table.
There is another village on one of the maps, located near where the building in this photo appears to be. On the map in question that village is labelled AHMED KHAN. The interesting design of the building in this photo made me pause and wonder if instead of a village "Amed Khan" might have been a shrine or small mosque dedicated to AHMED SHAH -- who was also known as Ahmed Khan. He was the founder of the Durrani Dynasty which ruled Afghanistan from 1747 until 1823 and is generally credited with being the founding father of modern Afghanistan. Even today his tomb in the city of Kandahar remains a major attraction...

I think that in one record of the battle I read about some Afghans holding a fortified position on a low hill in front of the tall rocky ridge, and that said position was described as "overlooking" or "commanding" AHMED KHAN. Unfortunately I can't seem to find the book or the passage, which is a bit frustrating, but maybe I imagined the whole thing. I'll keep you posted if I manage to dig it up. Meanwhile I am leaning towards trying to build a 28mm version of that peculiar building, even though I am unsure what it was.
Some Google Earth pics of the battlefield today:
Looking North from the end of the rocky ridge, note the foreground filled with crop-fields, orchards, and Karez irrigation channels running West towards their source in the Arghandab River:

View from the South-East, the left of the British start-line, with the saddle of the Baba Wali Kotal visible on the right:

View from Afghan right, with the village of PIR PAIMAL labelled on the map. Maps of the battle located this village on the other side of the "basin" between the two hills, at the foot of the other hill, closer to the British start-line. Note the abundance of green crop-fields, which continue past the bottom of the photo to the East bank of the Arghandab River:

Further North along the Afghan lines, with the narrow MURCHA KOTAL visible on the left, and the lush crop-fields stretching West towards the bank of the Arghandab, out of view at the bottom of the photo:

Finally, here are some tantalizing glimpses of more and potentially better VISUAL REFERENCE created before, during, and soon after the battle. If anyone reading this has access to one or more of them, I would greatly appreciate you getting in touch:
(1) a fold-out map of the battle contained in Howard Hensman's history of the Second Afghan War:

(2) A fold-out "Sketch Map to Illustrate the Action at Kandahar" between pages 512 & 513 of the same:
(3) a fold-out map of the "Environs of Kandahar" on page 545 of the Official History:


(4) a fold-out "Panorama of the Battle of Kandahar" on p.576 of the Official History:

(5) and finally a fold-out map of the "Battle of Kandahar" on p.582 of the same:

ARMY LISTS
Here are the generally accepted numbers for Afghan forces present at the battle, cited in "The Second Afghan War 1878-1880 Official Account" produced by the Intelligence Branch Army Head-Quarters, India, and "The Afghan War 1878-1880" by Howard Hensman (special correspondent of the Allahabad Pioneer and London Daily Mail who accompanied Roberts' army on the march and was present at the battle):

But this further snippet from the war correspondent Hensman's book, suggests there may have been far more Afghan tribesmen present on the battlefield:

There is also a question as to the number of Afghan cavalry, as one of the primary sources -- it may be Roberts in his memoir, "41 Years In India," but I have to double-check -- mentions Ayub's army containing "2,000 Sowars," AKA: Afghan regular cavalry.
* * *
BATTLE OF KANDAHAR – ARMY LISTS
BATTLE OF KANDAHAR – ARMY LISTS
(a/o Jan. 15, 2020)
BRITISH FORCES:
1st INF. BRIGADE
(General MacPherson)
92nd Highlanders 651 officers & men
23rd (Sikh) Pioneers 701 (solid brown turban)
24th Punjab Native Inf. 575
2nd Gurkhas 501 (wear khaki uniforms in painting)
-----
Total 2,428
2nd INF. BRIGADE
(General Baker)
72nd Highlanders 787
2nd Sikh Inf (PFF) 612
3rd Sikh Inf (PFF) 570
5th Gurkhas 561 (red dicing on caps, white or khaki leggings)
-----
Total 2,530
3rd INF. BRIGADE
(General MacGregor)
60th Rifles, 2nd Battalion 616
15th (Ludhiana) Sikhs 650
25th Punjab Native Inf. 629
4th Gurkhas 637 (definitively in khaki uniforms per 1880 photo)
-----
Total 2,532
GRAND TOTAL INFANTRY: 7,490
(Combined Infantry brigades overseen by General John Ross)
CAVALRY BRIGADE
(General Gough)
9th Queen’s Royal Lancers 337 (11)
3rd Bengal Cavalry 401 (13) (formerly 2nd Skinner’s Horse, blue over yellow pennons)
3rd Punjab Cavalry 417 (14)
Central India Horse 506 (17)
CAVALRY GRAND TOTAL: 1,661
ARTILLERY DIVISION
(Colonel Alured Clarke Johnson)
No. 6 Battery 8th Brigade Royal Artillery 240 + 6 screw guns (or is this 9/8 RA?)
No. 11 Battery 9th Brigade Royal Artillery 240 + 6 screw guns
No. 2 (Dejarat) Mt. Battery 145 + 6 screw guns
ARTILLERY GRAND TOTAL: 625 + 18 guns
ALL TOLD 9,776 TROOPS (or 6,898?)
OFFICIAL NUMBER ENGAGED IN BATTLE (remainder sick or detached to protect Kandahar city or the force’s cantonment): 8,392
KANDAHAR GARRISION ENGAGED IN BATTLE: 4,110 (or 3,200)
Grand Total Anglo-Indian troops deployed for battle: 12,502 (or 10,092?)
BOMBAY TROOPS OF KANDAHAR GARRISON USED FOR THE BATTLE:
MG PRIMROSE force to support Cav. Brigade at Gundigan:
E-B Royal Horse Artillery
2 companies 7th Fusiliers
4 companies 28th Bombay Native Inf.
BG BURROWS force to take position at Kalachi-i-Haider to threaten Baba Wali Kotal and watch over Kotal-i-Murcha:
No. 5 Battery 11th Brigade Royal Artillery – 4 x 40 pounders
4 companies 7th Regt. of Foot (Royal Fusiliers)
4th Bombay Native Infantry
19th Bombay Native Infantry
Party of Sappers & Miners
BG DAUBNEY force to relieve Kabul Force piquets from Karez Hill to Piquet Hill to Chihilzina*:
4 companies 66th Foot
2 companies 1st Bombay Grenadiers
2 companies 28th Bombay Native Inf.
(*NOTE: Chihilzina was another village, I believe located to the North of the British lines)
BG NUTTALL Bombay Cavalry force to watch the Baba Wali and Murcha Kotals:
3rd Sind Horse
3rd Bombay Cavalry
HQ Poona Horse
ALSO (possibly?) C-2 Royal Artillery to join 1st Brigade of the Kabul Force, which already had 6/8 Royal Artillery (screw-guns)
ALL TOLD KANDAHAR ARTILLERY PRESENT FOR BATTLE:
4 x 40-pounders
4 x 9-poinder Horse Artillery
6 x 9-pounder Field Guns
6 x 9-pounder Field Guns

LINKS TO SOME SOURCES
"The Second Afghan War, 1878-1880, Official Account" by India Army Intelligence Branch
*** *** ***
*** *** ***
Whew!
And now -- finally -- just how do I plan to game this dang battle?
That's a lot to cover:
-Terrain layout.
-Orders of Battle -- and the troops to go with them.
-Scenario & Victory Conditions -- and any "special rules" to go with them.
After this veeeeerrrrrrry long opening chapter, I will space out the above over the coming days & weeks hopefully leading up to the arrival of a bunch of good friends and gaming comrades from almost all points of the compass for the game itself in the middle of August. Please G-d it will work out that
But before signing off I will share my initial thoughts on the ORDERS OF BATTLE...
FIGURES & UNITS FOR KANDAHAR GAME:
BRITISH:
1 unit Highlanders in kilts (92nd)
1 unit Highlanders in trews (72nd)
1 unit 60th Rifles (in khaki or green)
1 unit Sikh Pioneers (brown turbans) (23rd Bengal Native Inf/Sikh Pioneers)
2 units Punjab Infantry (24th & 25th – uniform & turban details?)
3 units Gurkhas (2nd, 4th & 5th)
3 units Sikh Inf (2nd, 3rd, 15th Ludhiana – turban details for 2nd & 3rd?)
3 units Indian cavalry (3rd Bengal, 3rd Punjab, Central India Horse – lance or sword armed + uniform & turban details?)
Using 1 fig = 30 men ratio (as opposed to 1:15 with 2 basic unit “Wings” per Inf Regt/battalion as I used for Charasiab refight) then…
3 x Inf. Brigades with 4 units/85 figs each = 12 Inf. units/255 figs
4 cav units = 48 figs in 4 x units of 12 figs each (or 55 figs in varied size units)
3 mt. gun batteries = either 24 figures in 3 x 2-gun batteries OR 36 figs in 3 x 3-gun batteries (equals almost double number of gunners present)
Real number of troops was 9,776 at 1:30 ratio = 326
Inf. 255 + Cav. 48 + Art. 24 = 327 – pretty dang close to 326.
Overall 11,000 Anglo-Indians w/32 guns VS approx. 15,000 Afghans w/32 guns
Room for 40 more figures from Kandahar garrison force (including 40-pounder artillery crews)
AFGHANS:
Believed to have fielded 15,000 men = 500 figures in total + same # guns as Brits (6 or 9)
4,800 regulars = 160 figs = 2 x 83 fig. Inf brigades (4 basic units EA) = 166 figs
(possibly + 24 or 36 Art. crew serving 6 or 9 guns?)
8,000 irregulars & tribesmen = figs = 4 x 61 fig. tribes (3 basic units EA) = 244 figs
(How many Ghazis?)
______
______
13,020 Afghans in total 434 figs + 6 guns
Troops = 30:1 (13,020 to represent approx. 12.5K to 15K)
Guns = 5:1 (30 guns by ratio to cover 32 guns on the day)
Afghan Cavalry:
2,000 regular cavalry (“sowars”) or possibly 3,000 Afghan cavalry all told (maybe 2,000 regulars plus 1,000 tribals?)
3,000 ÷ 30 = 100 maximum Afghan cavalry. Reg. Cav = 67 figs MAX, leaves 33 figs Tribal Cav.
3,000 ÷ 30 = 100 maximum Afghan cavalry. Reg. Cav = 67 figs MAX, leaves 33 figs Tribal Cav.
*** *** ***
LAST-MINUTE BLOG BONUS...


ONE QUESTION ABOUT THE TERRAIN...
*** *** ***
LAST-MINUTE BLOG BONUS...
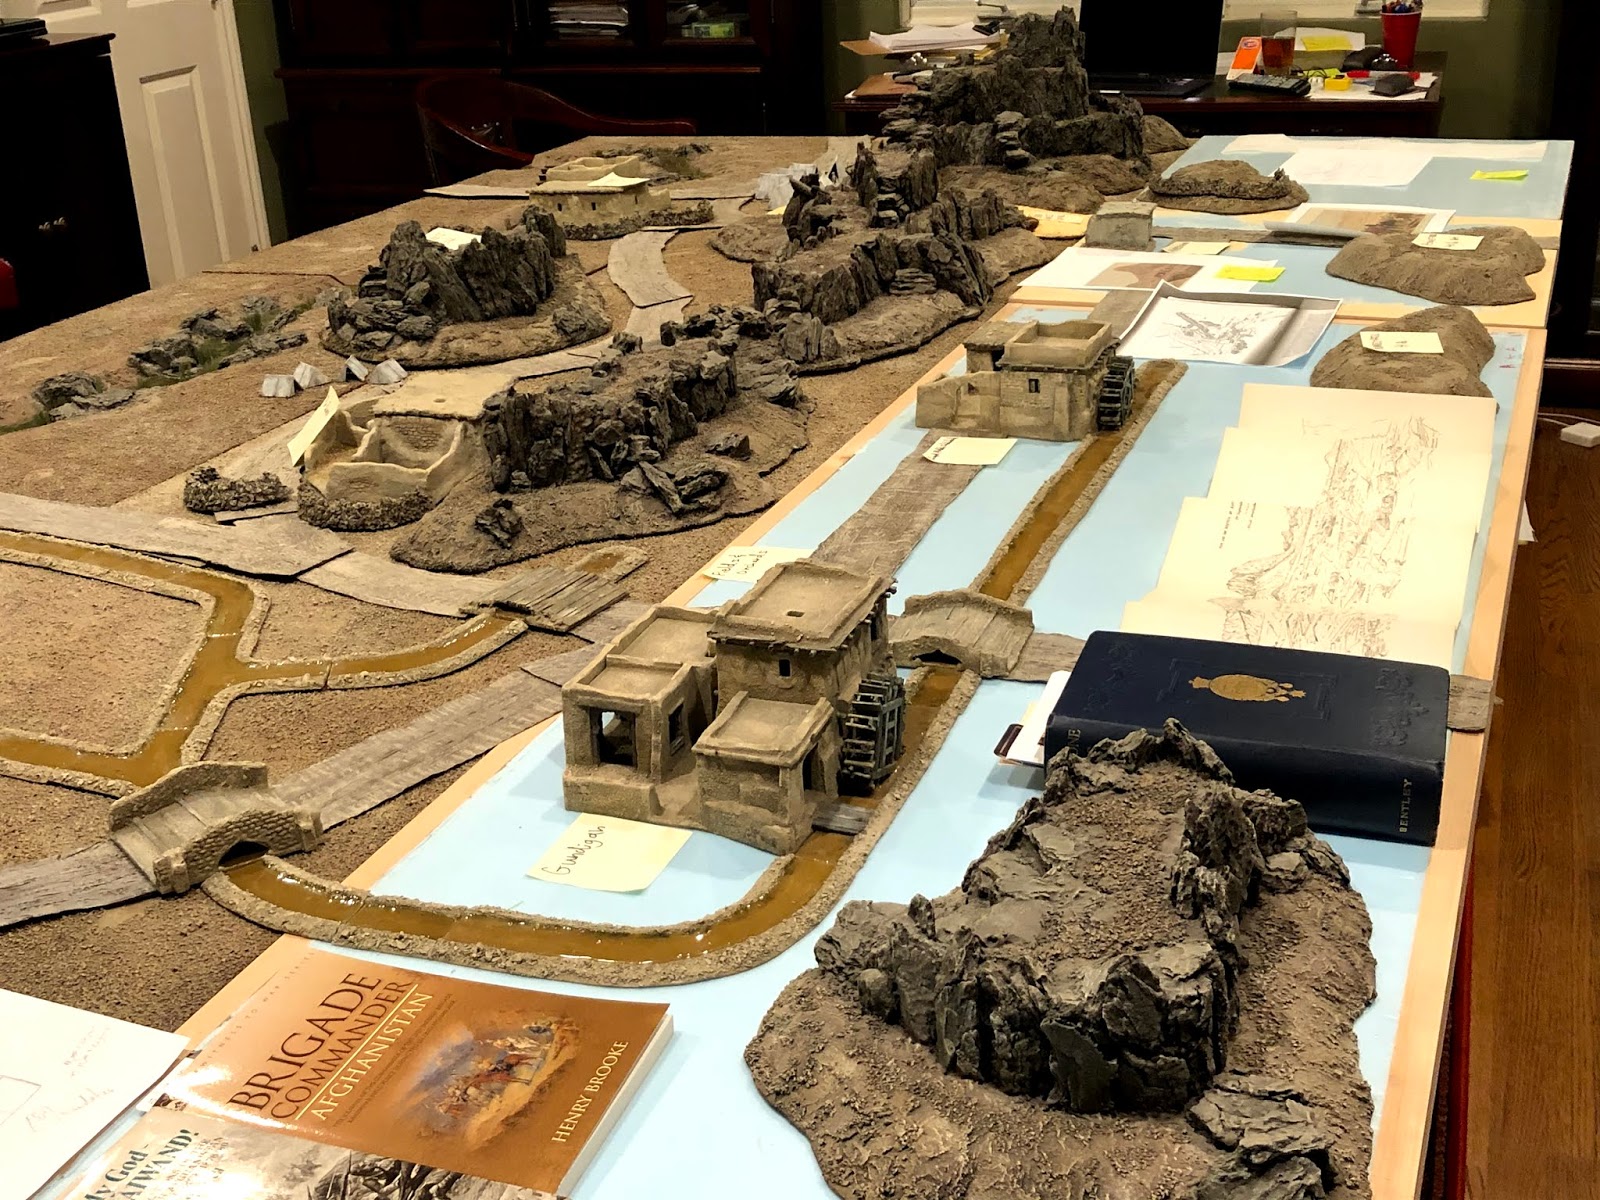
First look at the WIP* Baba Wali Table:
(*One glimpse & you'll see there is a HELLUVA LOT to do!)

Karez and Piquet hills, from which General Roberts and his staff oversaw the early stages of the battle...

The village of Gunda Mullah Sahibdad, site of very fierce close-quarter fighting...


The village of Pir Primal sits nestled behind PIR PAIMAL HILL. This hill serves as the far Southern end of the "razorback ridge" of tall rocky hills that ran across the middle of the battlefield...

A big breakthrough for me in trying to make my preexisiting terrain work for this new Baba Wali layout was realizing I could build a bespoke "Baba Wali Kotal" to fit snugly between two of my extant rocky hills and stand in for arguably the most vital piece of terrain on the table, rather than make a massive new hill with the vital pass built into it. Obviously the Kotal is still a work-in-progress but I think it will do the trick nicely...

View of the table looking South from the narrow North end...

Same direction, higher angle view...

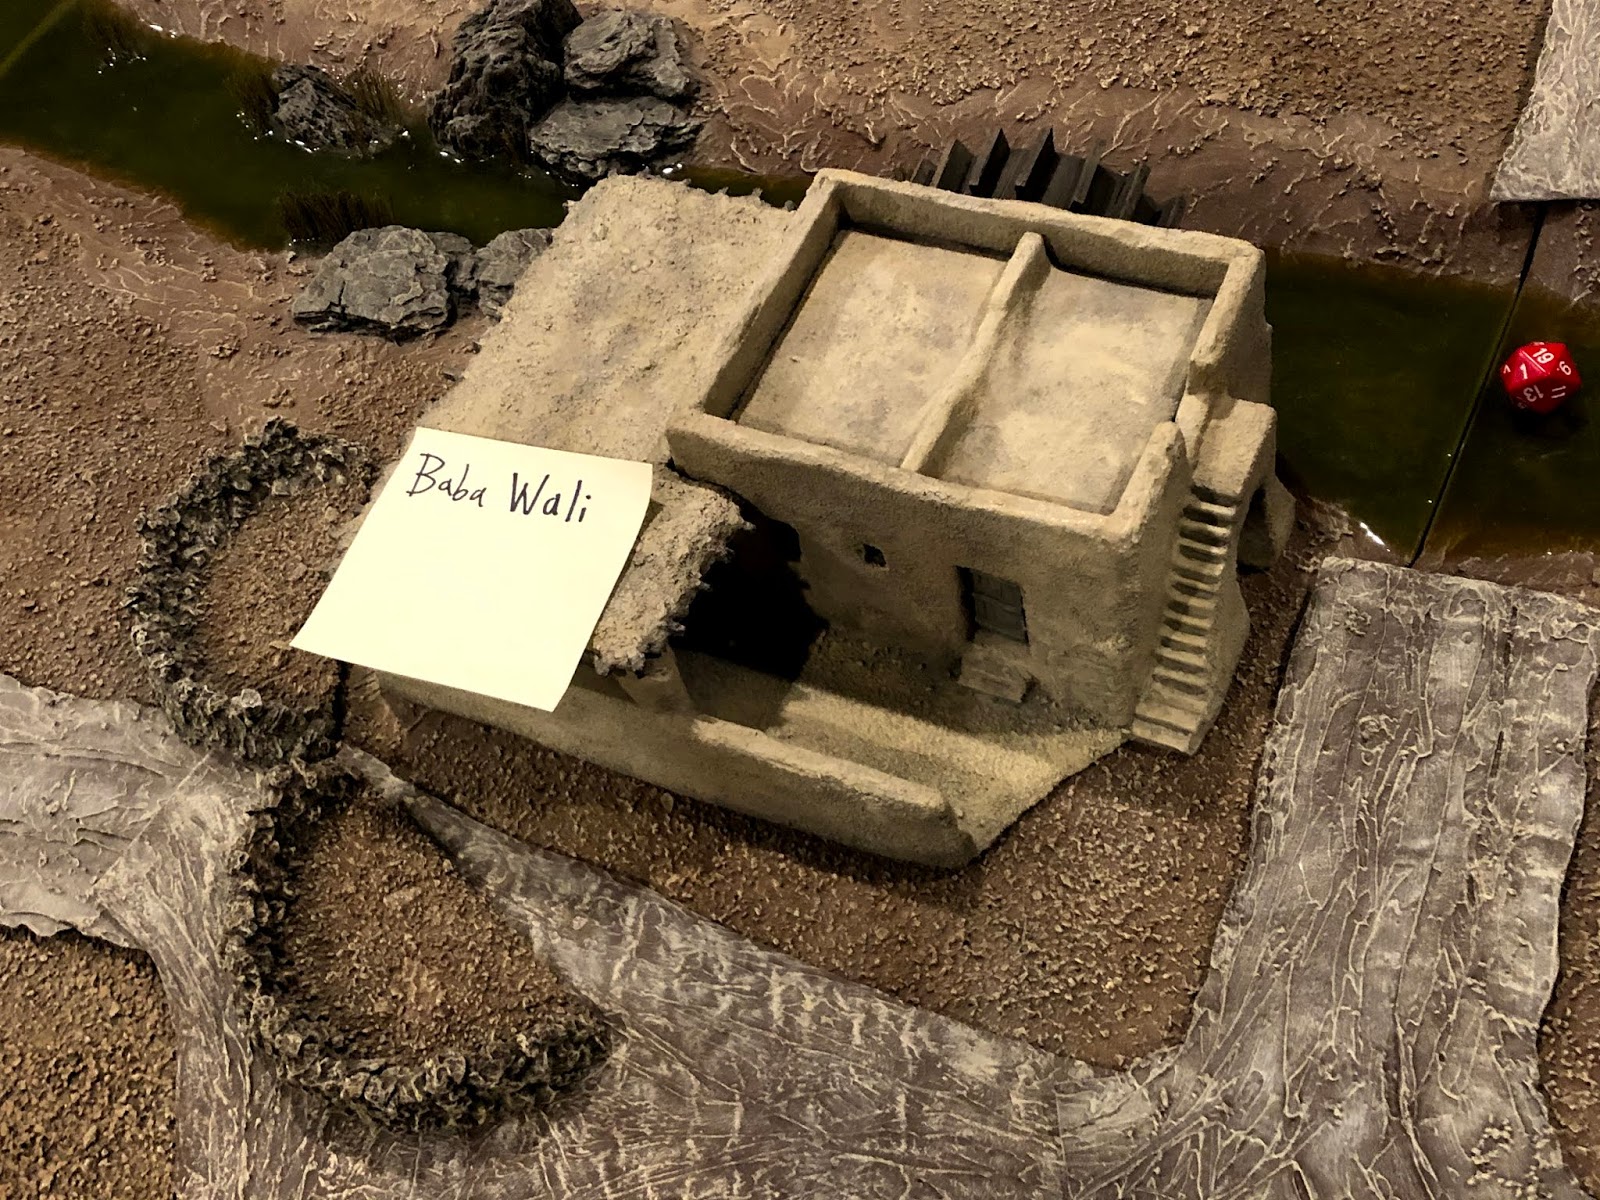
*NOTE THE RED DIE representing one of 3 FORDS across the Arghandab River...

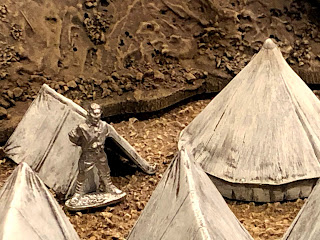
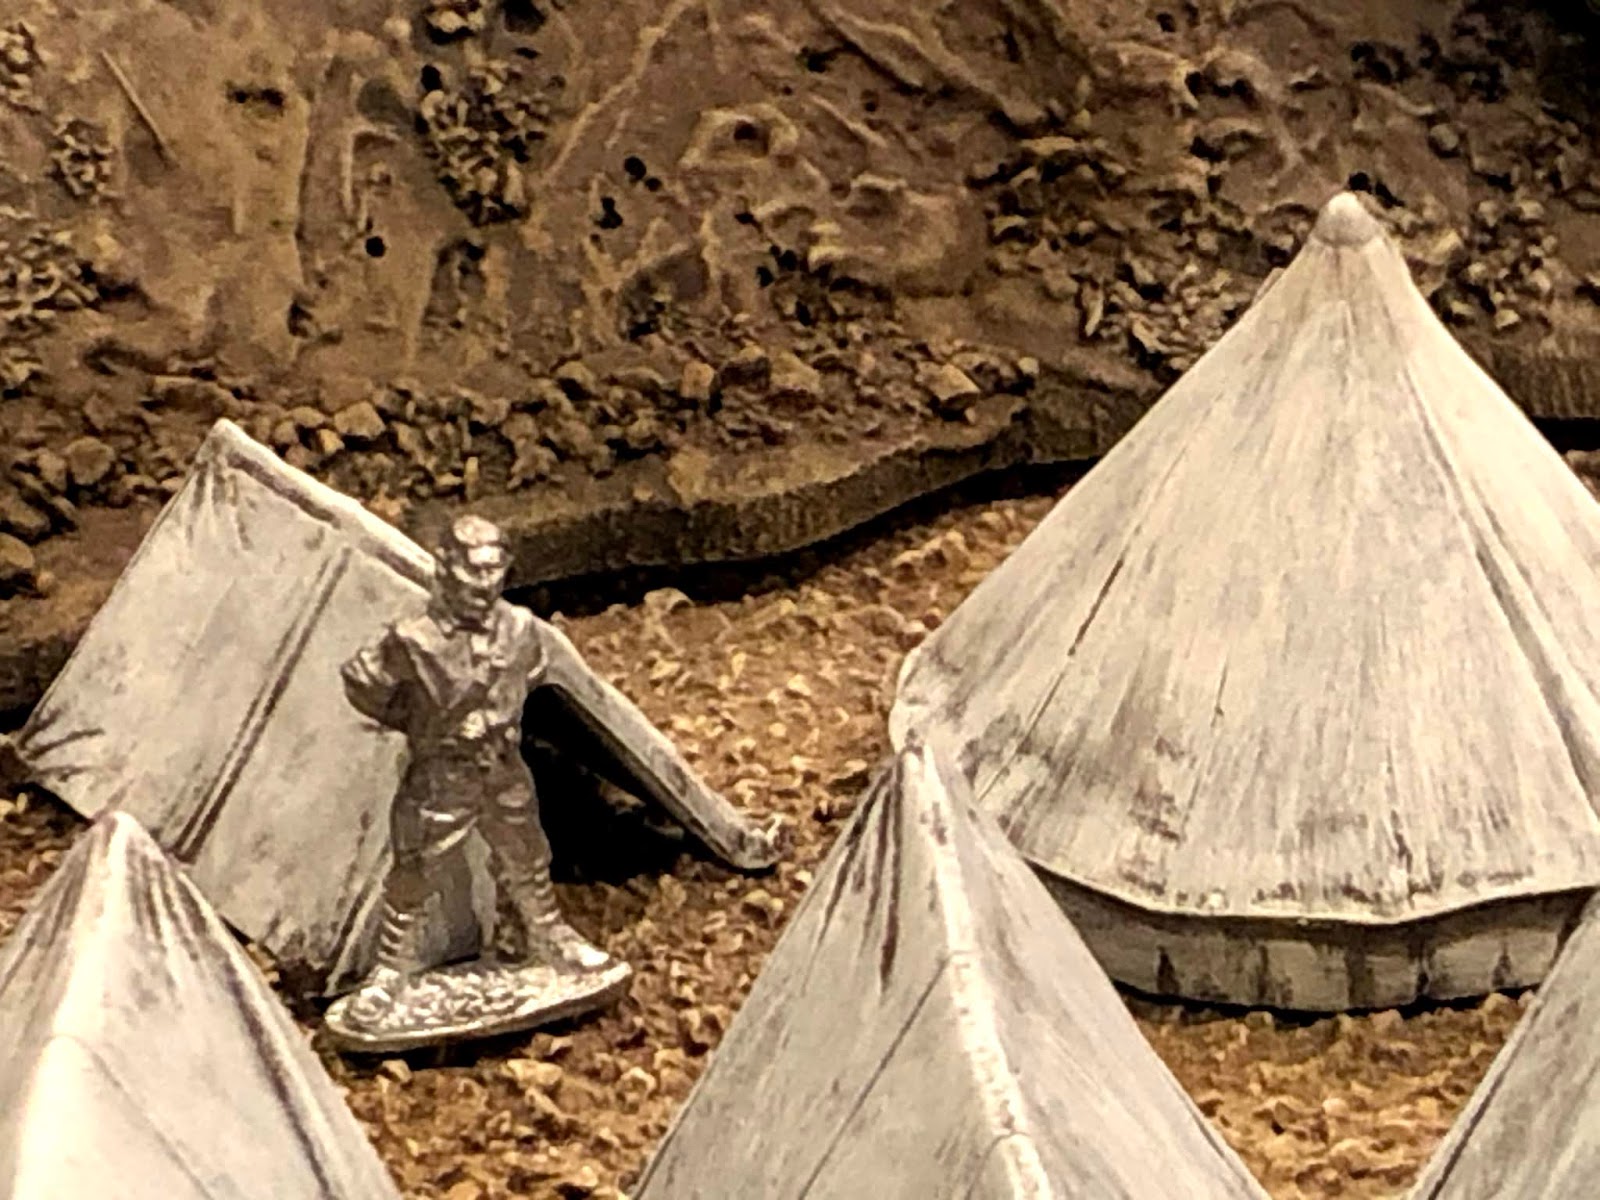
Lt. Hector Maclaine in prisoner mode WIP conversion:
(I'll cover the conversion itself in more detail in a future post)

Lt. Maclaine is posed in front of his "small tent" amidst a scale representation of Ayub Khan's big main camp...
Since I built the Kotal from scratch I made sure most it not all figures can stand on its slopes...


I tried to help the Kotal fit in with the adjacent hills by placing wood-chip "rocks" to blend in with the neighbors...

On the West side of the Kotal sits Baba Wali village, which is noted as having been heavily fortified at the time of the battle...
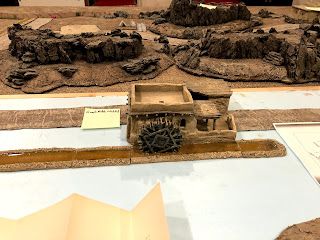
I couldn't keep myself from using the partially-submerged waterwheel I built last Summer for the Vauban layout!


One terrain detail I didn't know until reading Hensman's book was that the Afghan Army had a SECOND MUCH SMALLER CAMP across from the village of Pir Primal, which the British had to fight their way past before reaching the main camp further North...

Pir Paimal village was also well-fortified by its Afghan defenders prior to the battle...

The great "panorama" sketch of the battlefield in Roberts' book shows this portion of the battlefield surrounding the Village of GUNDIGAN and covering the ground between it and the river, being filled with WALLED GARDENS, ORCHARDS & CROP-FIELDS -- but it wasn't until I read Hensman's book that I learned it was also cut up by irrigation channels feeding water from the Arghandab to the fields, and that these channels reached all the way to the village of Gunda Mullah Sahibdad to the North. I still need to make a couple more "reverse waterfalls." Please don't ask me how the higher level manmade channels are fed by water from the lower level river!

Here you can see the Karez (irrigation canal) stretching North to Gunda Mullah Sahibdad...
ONE QUESTION ABOUT THE TERRAIN...
...remains. This is whether or not to EXTEND the North end of the table an additional 2' so that I can incorporate MURZA KOTAL along its far Northern edge. In the real battle Roberts sent no troops into action on there until the Afghans had begun to route away and victory was nearly assured, but... it could be good to give the British player(s) a third possible path of advance, and the Afghan player(s) a third possible line of attack to defend against or possibly use for an attack of their own. It's possible for me to extend my table those 2 additional feet to 12' maximum by moving desk. It's a bit of a production (as my Dear Departed father, may he Rest In Peace) would say, but it could be done. It would also provide a bit more space for both armies to spread out and potentially maneuver across.
*** *** ***
NEXT UP: Some pics of the embryonic terrain layout, including some useful discoveries on my part while going back-and-forth between the primary sources and the tabletop terrain, while fine-tuning the layout...
PS. Anyone out there with additional info, comments or corrections -- especially corrections! -- I implore you to leave a comment below!
PPS. Changing subjects back to the worldwide COVID-19 crisis, I wish you & your friends and family good health and fortitude, and again for those of you in the medical profession, THANK YOU and G-d willing stay safe.
what a wonderful post...stay safe
ReplyDeleteA splendid and detailed post, just right for an afternoon's read whilst 'self-quarantined.' Good luck with the project, and I hope the current crisis fades away before the game is due.
ReplyDeleteSuperb! Can't wait to follow this project!
ReplyDeleteOnce again I am stunned by the minute details you incorporate into this blog/wargames i.e., the photos, the terrain [your table], and most especially the order of battle(s). But, I have known you a long time and I should have remembered you do this in everything you set out to do. Bravo.
ReplyDeleteGlad to hear your all fine (we are too). My love to you and your whole family, and if you get a moment give me a call I have a few updates.
Til then, remember - "If the desert doesn't get you, the Arabs will, if the Arabs don't get you, the Legion will, if the Legion doesn't get you, then I will!" Gene Hackman, "March or Die"
JimmyG
"One of my men got restless."
DeleteJim! Great to see you here, my friend, and a great quote you left me indeed! And THANKS AGAIN for sharing the multiple maps, diagrams & panoramas of this battle, which have enabled me to improve the accuracy of my tabletop.
As usual, your research and attention to detail are impeccable. Thanks for all you do.
ReplyDeleteJohn
Another epic post very well done. I will be back to absorb some more of this in the near future.
ReplyDeleteBest wishes
Willie
MG, this sounds like it will be another amazing and epic Mad Guru spectacular! Very well done blog post and deeply researched NWF scenario. Your exhaustive research and attention to detail always produces an incredible outcome. The blog post is well worth the read and was time well spent. I will continue to eagerly follow the progress of this project.
ReplyDeleteCheers,
Sgt G
speechless...
ReplyDeleteMany thanks for the big compliment, Mltiadis!
DeleteI see you posted a while back but stumbled on this lately as I am finishing up my board game design for Kandahar. You seem to have 2 less cavalry regiments than I have seen elsewhere. Otherwise, a very complete list along with other valuable thoughts.
ReplyDelete