"ONE LADDER AND ALLAH'S BLESSING"
—The untold story of the SECOND Battle of Ali Masjid...
& the first-ever meeting of Mulehead and Umra Khan—
The 1878 battle of Ali Masjid is known to history as the first action of the Second Anglo-Afghan War of 1878-1880, but hidden until now has been the tale of the Second Battle of Ali Masjid, fought approximately one year later, when a coordinated attack was launched by combined regular, tribal and ghazi forces on the Afghan mountain fort which was by then occupied by a British brigade and also on the division strength column dispatched to relieve them.
This battle holds added significance for the players in the "NEVER TRUST ANYONE ON THE FRONTIER!" North-West Frontier campaign over on the Lead Adventure Forum, since it was there that arguably the two most note-worthy figures on the entire frontier — the ever evil Mulehead Khan of the Waziris (my hated foe), and the ever enlightened Umra Khan of the Afridis (my honored friend) — first crossed paths.
Handy LINK to the current (as of August 4, 2024) page of the campaign over on LAF:
CURRENT PAGE OF CAMPAIGN
Handy LINK to the very first page -- 3+ years & 100K+ views ago:
STARTING PAGE OF CAMPAIGN
GAME MASTER NOTE: This game was played on the night of June 28, 2024, by 5 players and 3 GM's. As the "lead" GM who had set up the game, I was VERY lucky to have my son, Skylar, and our buddy Matthew R. there to help out. The game was a pretty big success, in terms of everyone present having having a good time, which after all is one of if not the only significant measurement of such things. I want to take this opportunity to again thank Matthew R. -- who spent a couple of days during the week leading up to the game helping me do vital play-testing of the scenario -- and Skylar for all of their help, and also to thank the 5 awesome players: Chick, Doug, Matthew D., Michael, and Paul, who all brought super-positive and generous attitudes to the table -- no matter how desperate and dire their circumstances became! ... Now back to the historical narrative:
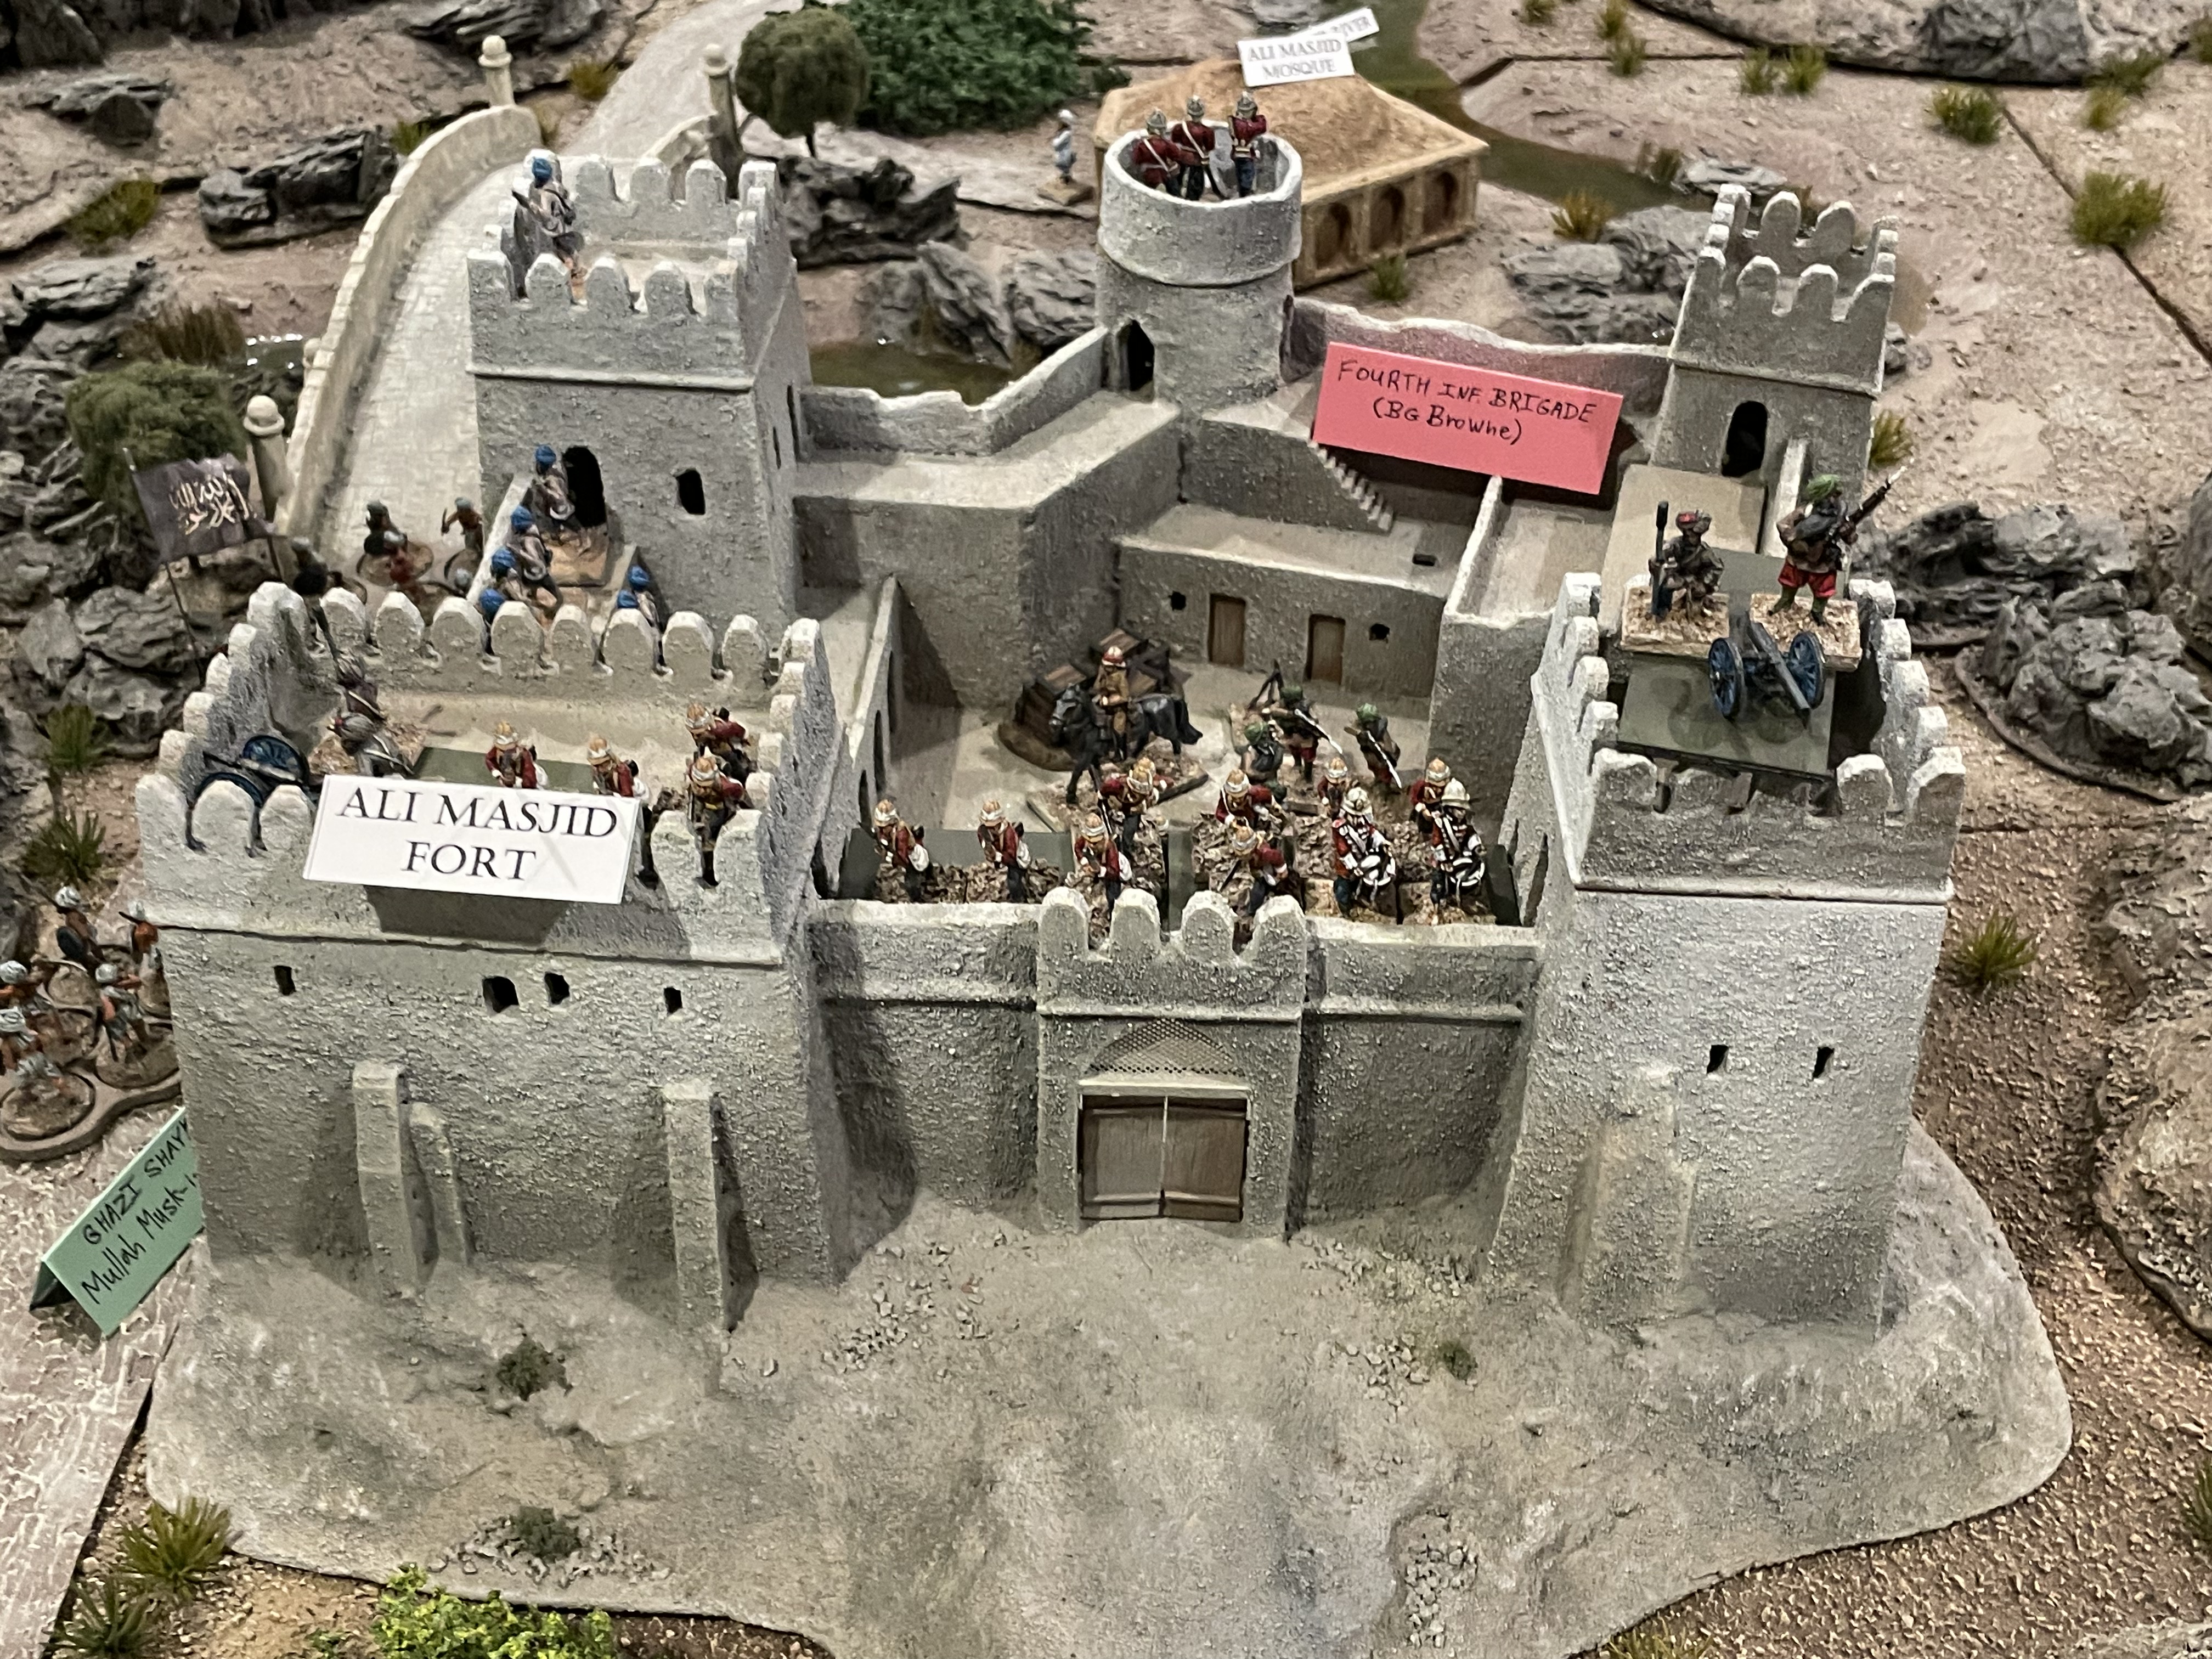
Following the November 1878 British victory in the battle for the mountain fortress, Brigadier General Browne's 4th Infantry Brigade was assigned to occupy it, supported by a battery of 2 Indian Mountain Guns. Six months later, when the signing of the Treaty of Gandamak officially brought peace, the remainder of Lieutenant General Sir Sam Browne's Peshawar Field Force was withdrawn across the border back to Peshawar in British India.
Then in September 1879 came the mutiny of Afghan Regular Army troops in Kabul, which resulted in the massacre of Major Sir Louis Cavagnari and his Guides escort, and ignited the "Second Phase" of the war.
Lost to the dustbin of history until now was the follow-up attack on the British-occupied fortress of Ali Masjid.
This attack was launched by the same Afghan General who had commanded the defense of the fort the year before -- Gholam Hyder Khan (MICHAEL), in coordination with local Tribal and Ghazi forces led by Mullah Musk-i-Alam (CHICK).
The fort was defended by Brigadier General Browne (PAUL) and his FOURTH INFANTRY BRIGADE, with a battery of 2 INDIAN SCREW-GUNS in support.
A strong British relief column comprising the rest of the Division-strength Peshawar Field Force -- 3 x Inf. Brigades, of 3 battalions each, 1 x cavalry Brigade & 1 x Artillery Brigade -- is advancing up the road from Peshawar to the South, led by Lieutenant General Sam Browne, VC (DOUG) and his dashing cavalry commander, Brigadier General Charles Gough, VC (MATTHEW D.).
While the Afghan Regular Army troops must start the battle deployed for all to see, the location of their tribal and Ghazi brothers-in-arms remains unknown to the British until revealed during the battle.
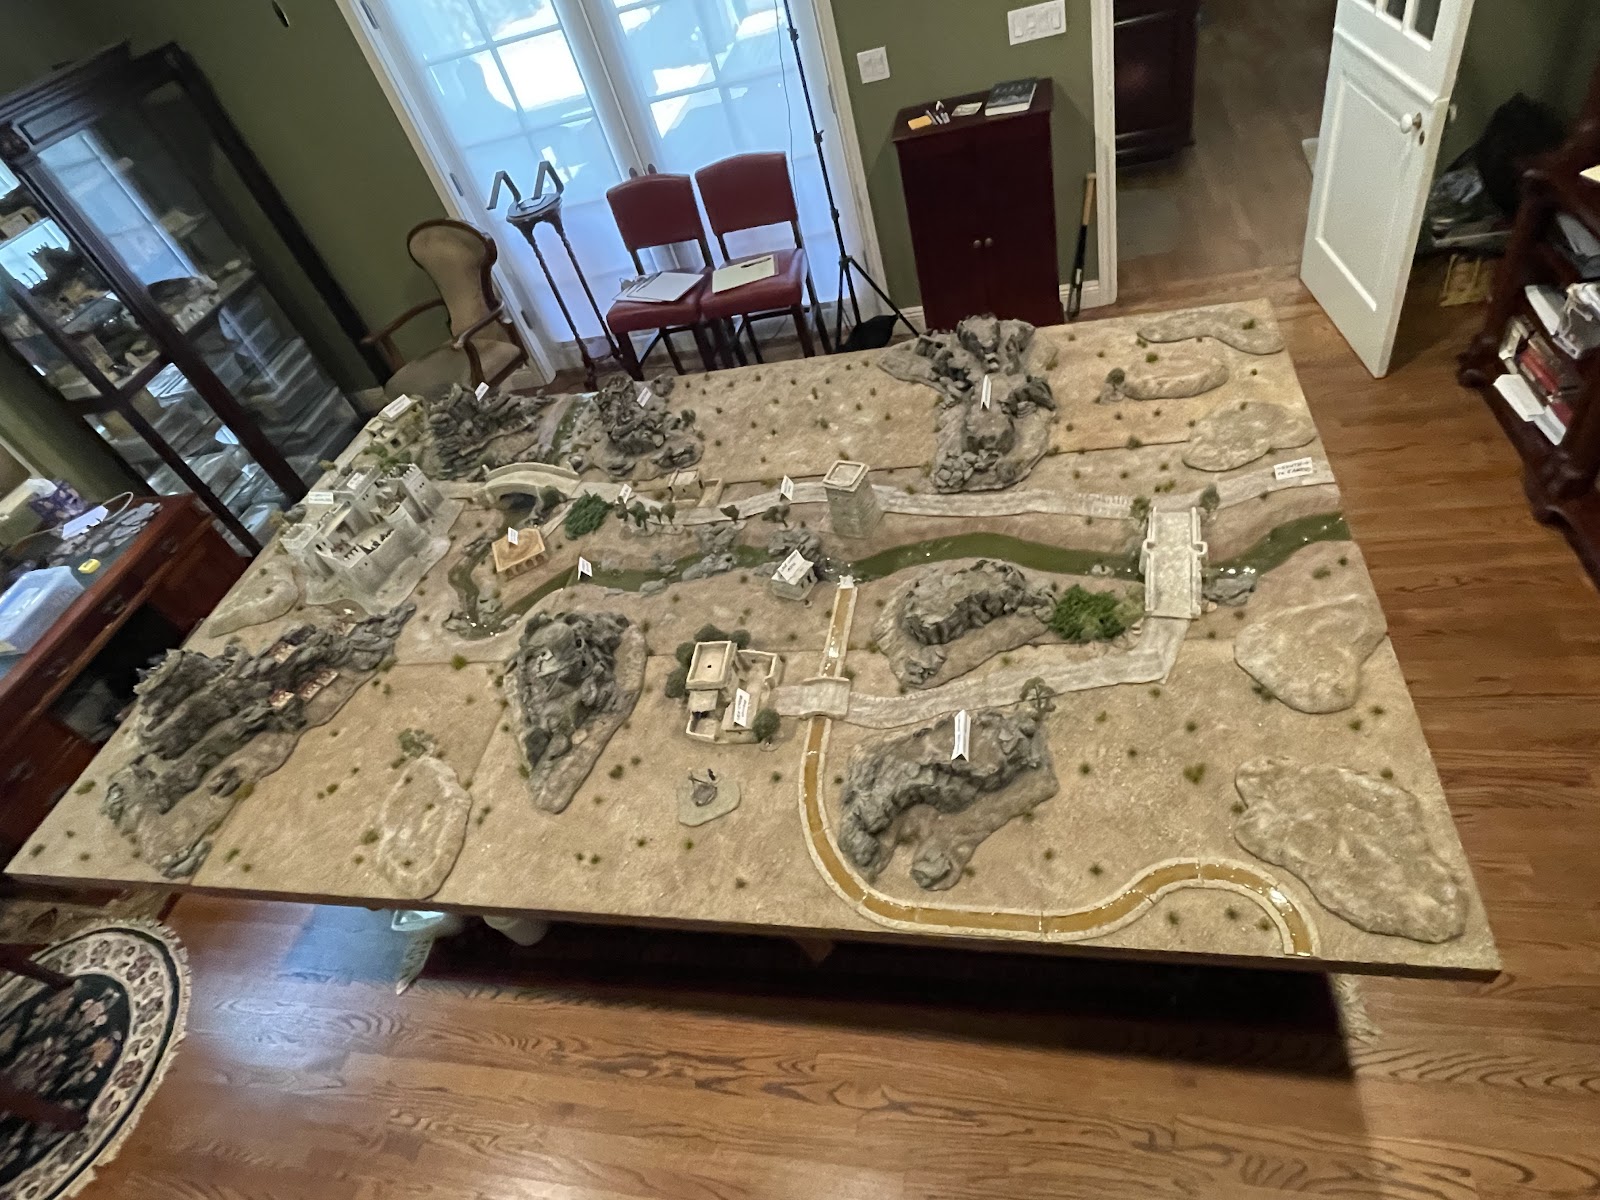
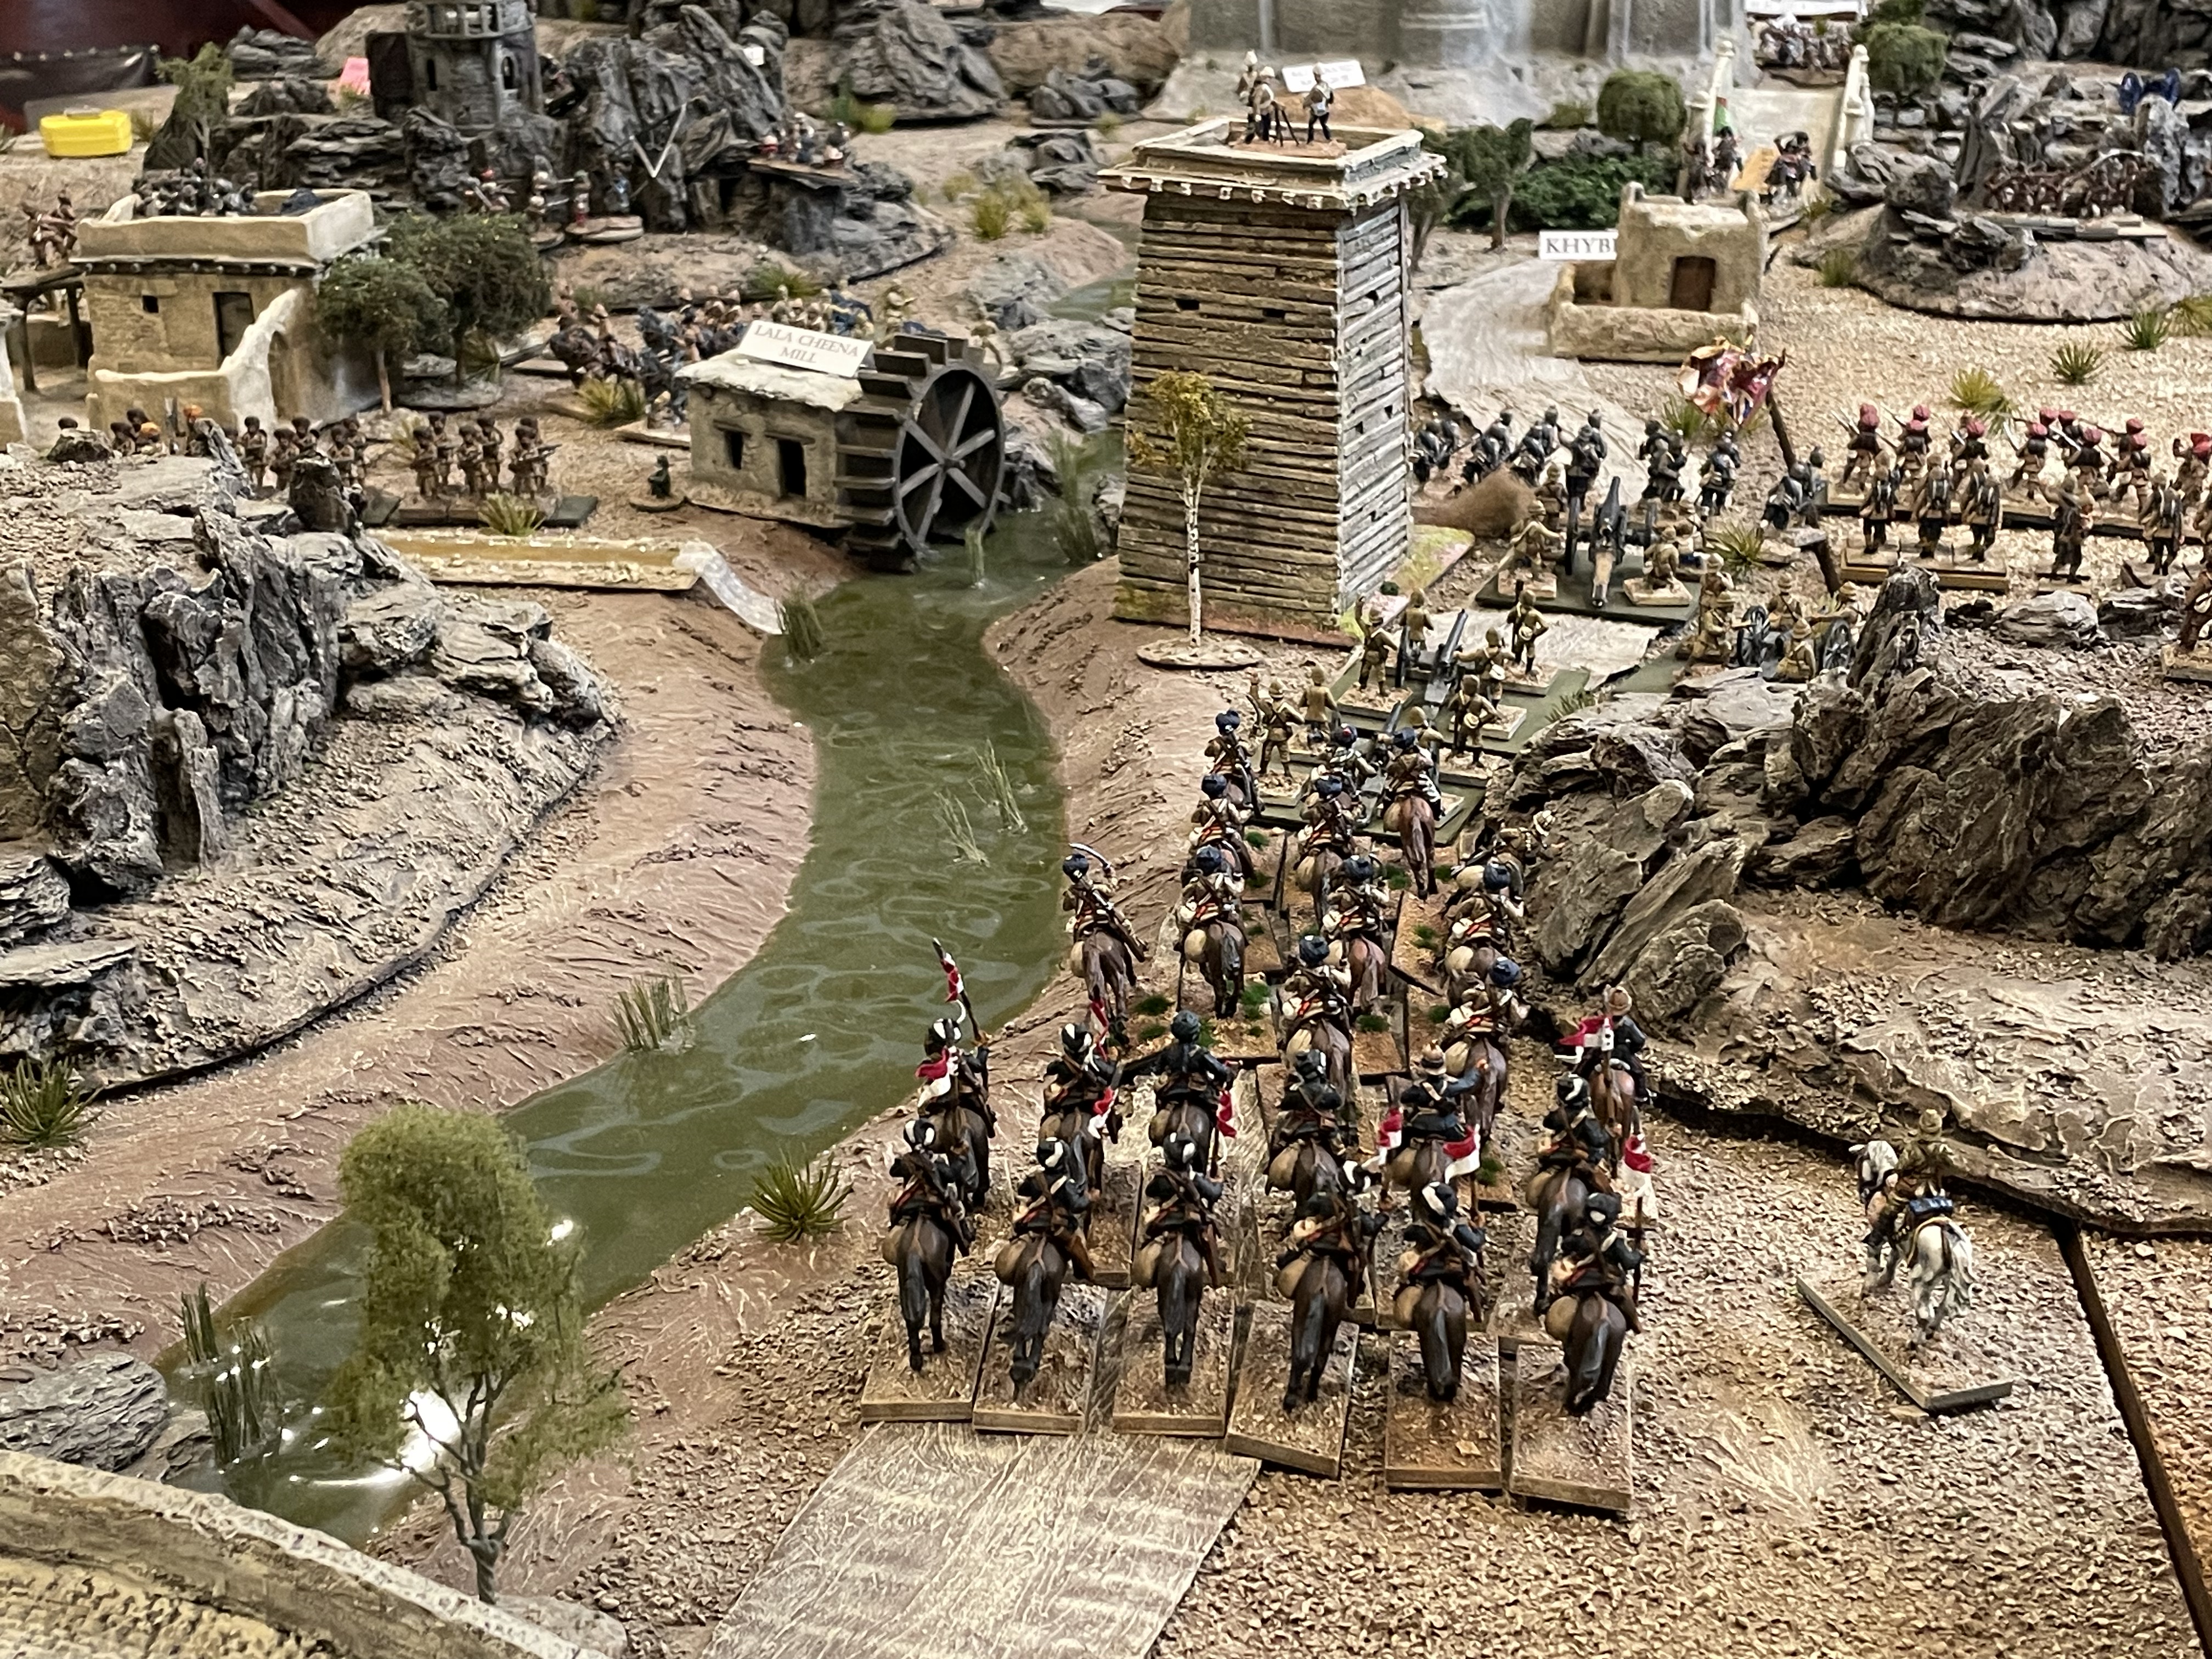
THE BATTLEFIELD...
Looking North from the South:
Looking West from the East:
Facing South from the North:
Looking East from the West:
HIDDEN DEPLOYMENT MAP FOR
AFGHAN TRIBAL & GHAZI FORCES:
VICTORY CONDITIONS:
If the Afghans can overcome the Fort defenses and get inside BEFORE one intact unit of the British relief column reaches it, they WIN. In order to qualify as “intact” a unit must be at or above 50% strength with at least 1 Leader present & accounted for.
If the British can keep the Afghans outside the Fort until an intact unit of the Relief Column arrives, they WIN.
In order to qualify as “arrives” the front end of the intact unit must move into contact with the front gate.
Though they'd never met before, young MULEHEAD and even younger UMRA both heeded the call for Jihad and arrived for the battle under the Purple Edged Green banner of the Kabul Ghazi Band.
Thanks to family connections back in Waziristan, Mulehead was bestowed the rank of MALIK and -- despite his youth (though he was a bit older than Umra) -- was given command of the Kabul Ghazi Band under their purple-edged-green banner.
Umra had his heart set on serving under the black banner of the Kandahar Ghazi Band, but -- hailing as he did from his Afridi homeland in Tirah -- found himself assigned to Umra's Kabul group.
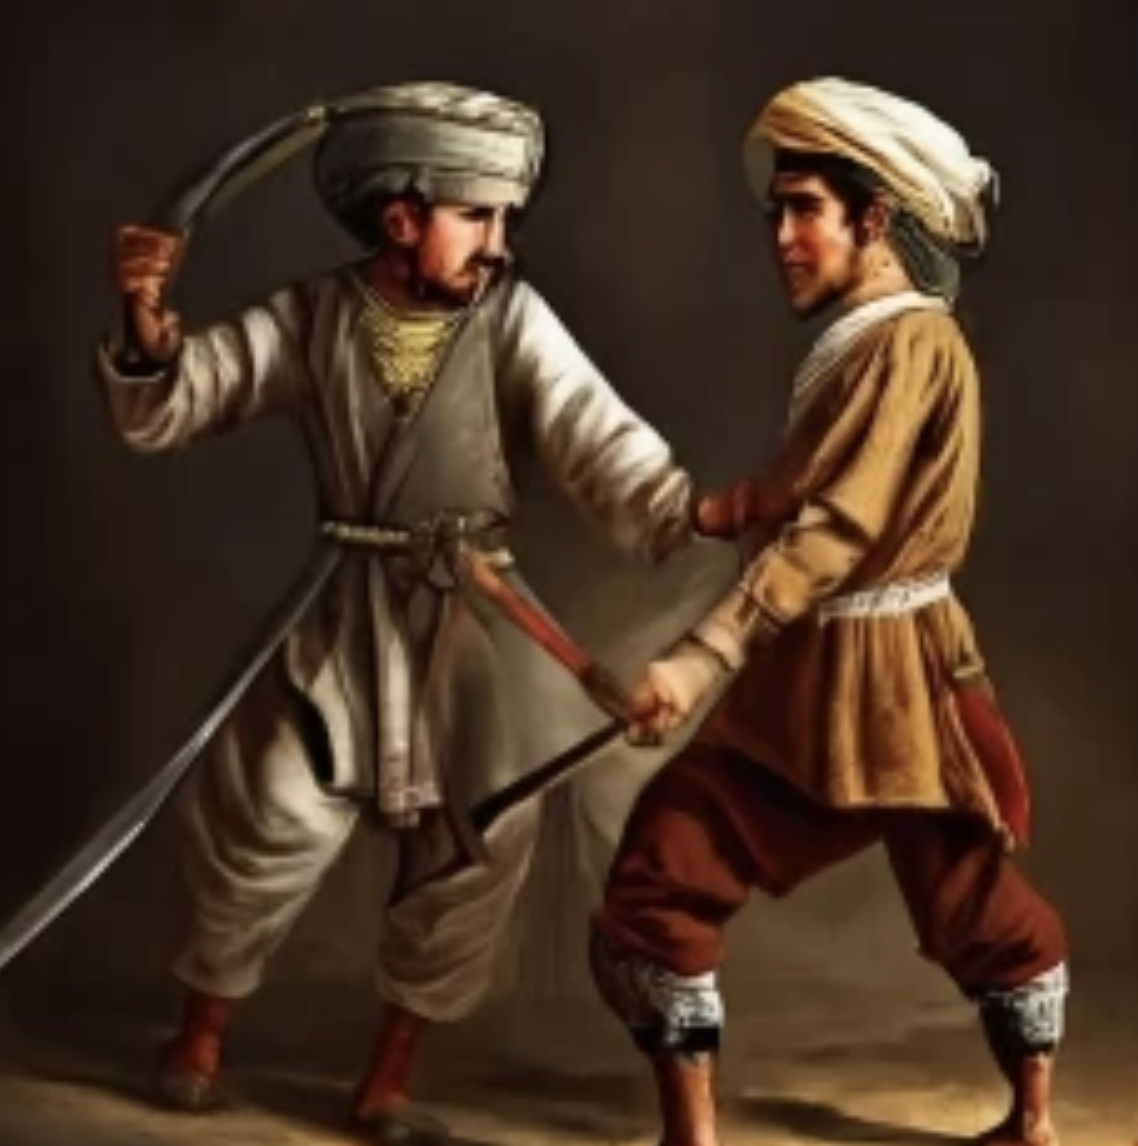
Some say young Mulehead and even younger Umra saw in each other Holy Warriors who -- while counting themselves devout Muslims -- had answered the call to Jihad as much for adventure... loot... and a chance at earthly, as opposed to holy, glory. These same person claim that in the few days leading up to the great conflagration, Mulehead and Umra became not just newfound brothers-in-arms, but fast friends.
Fate has revealed an artist's rendering of this momentous meeting of two future giants of the Frontier, in a quiet moment prior to the commencement of battle...
Now on to the battle itself...
My son, Skylar (MIDDLE) helps British Relief Force
commanders Doug (LEFT) & Michael (RIGHT) deploy the
lead elements of their army on the South end of the table:
In the distance to the North is their comrade,
beleaguered garrison commander Paul:
Afghan Regular Cavalry unit deployed
in watchtower East of Khyber River
One Afghan Regular Artillery gun deployed without
a shred of cover before the front gate of Ali Madjid Fort,
with General Sam Browne's head visible in far distance,
to the South, approx. where the city of Peshawar might be:
As things kicked off, the British relief force advanced from the far Southern end of the table as far and as fast as possible -- but sadly for them, that was neither far nor fast. The roads were limited and the risk of ambush lurked around every corner of low hill and rough terrain.
Meanwhile at the North table end the Afghans immediately commenced attack. The regular troops were pre-positioned atop the neighboring heights, which -- in keeping with reality -- were even higher than the fort itself. Their massed artillery and infantry pounded away at Ali Mashid and its occupants. Luckily for the British and Indian units within, they all qualified as CLASS IV (in a building or fort) targets, while the Afghans in the adjacent rocky mountains were only CLASS III (in rough terrain), and the lone courageous Afghan gun crew opposite the front gate was CLASS II. So despite being significantly outnumbered, the garrison of 2 Indian and 1 British infantry unit and 2 Indian screw-guns started out giving as good or better than they got in return.
GAME MASTER NOTES:
All guns used the same Firing stat line but Heavy Guns had 5 crew, Field Guns had 4, and Screw-Guns had 3. Also for this game "KEY FIGURE" picture cards were required to score hits on Artillery Crewmen.
2 separate card decks were used, one for the North end with British Garrison and Afghan Regular Army attackers, the other for the South end with British Relief Column and Afghan Tribal & Ghazi units in hidden deployment, waiting to ambush.
It turned out the Afghan commander overseeing the assault on the fort was something of a legend for his luck with the dice, and only time would tell if this reputation would hold true for the current battle...
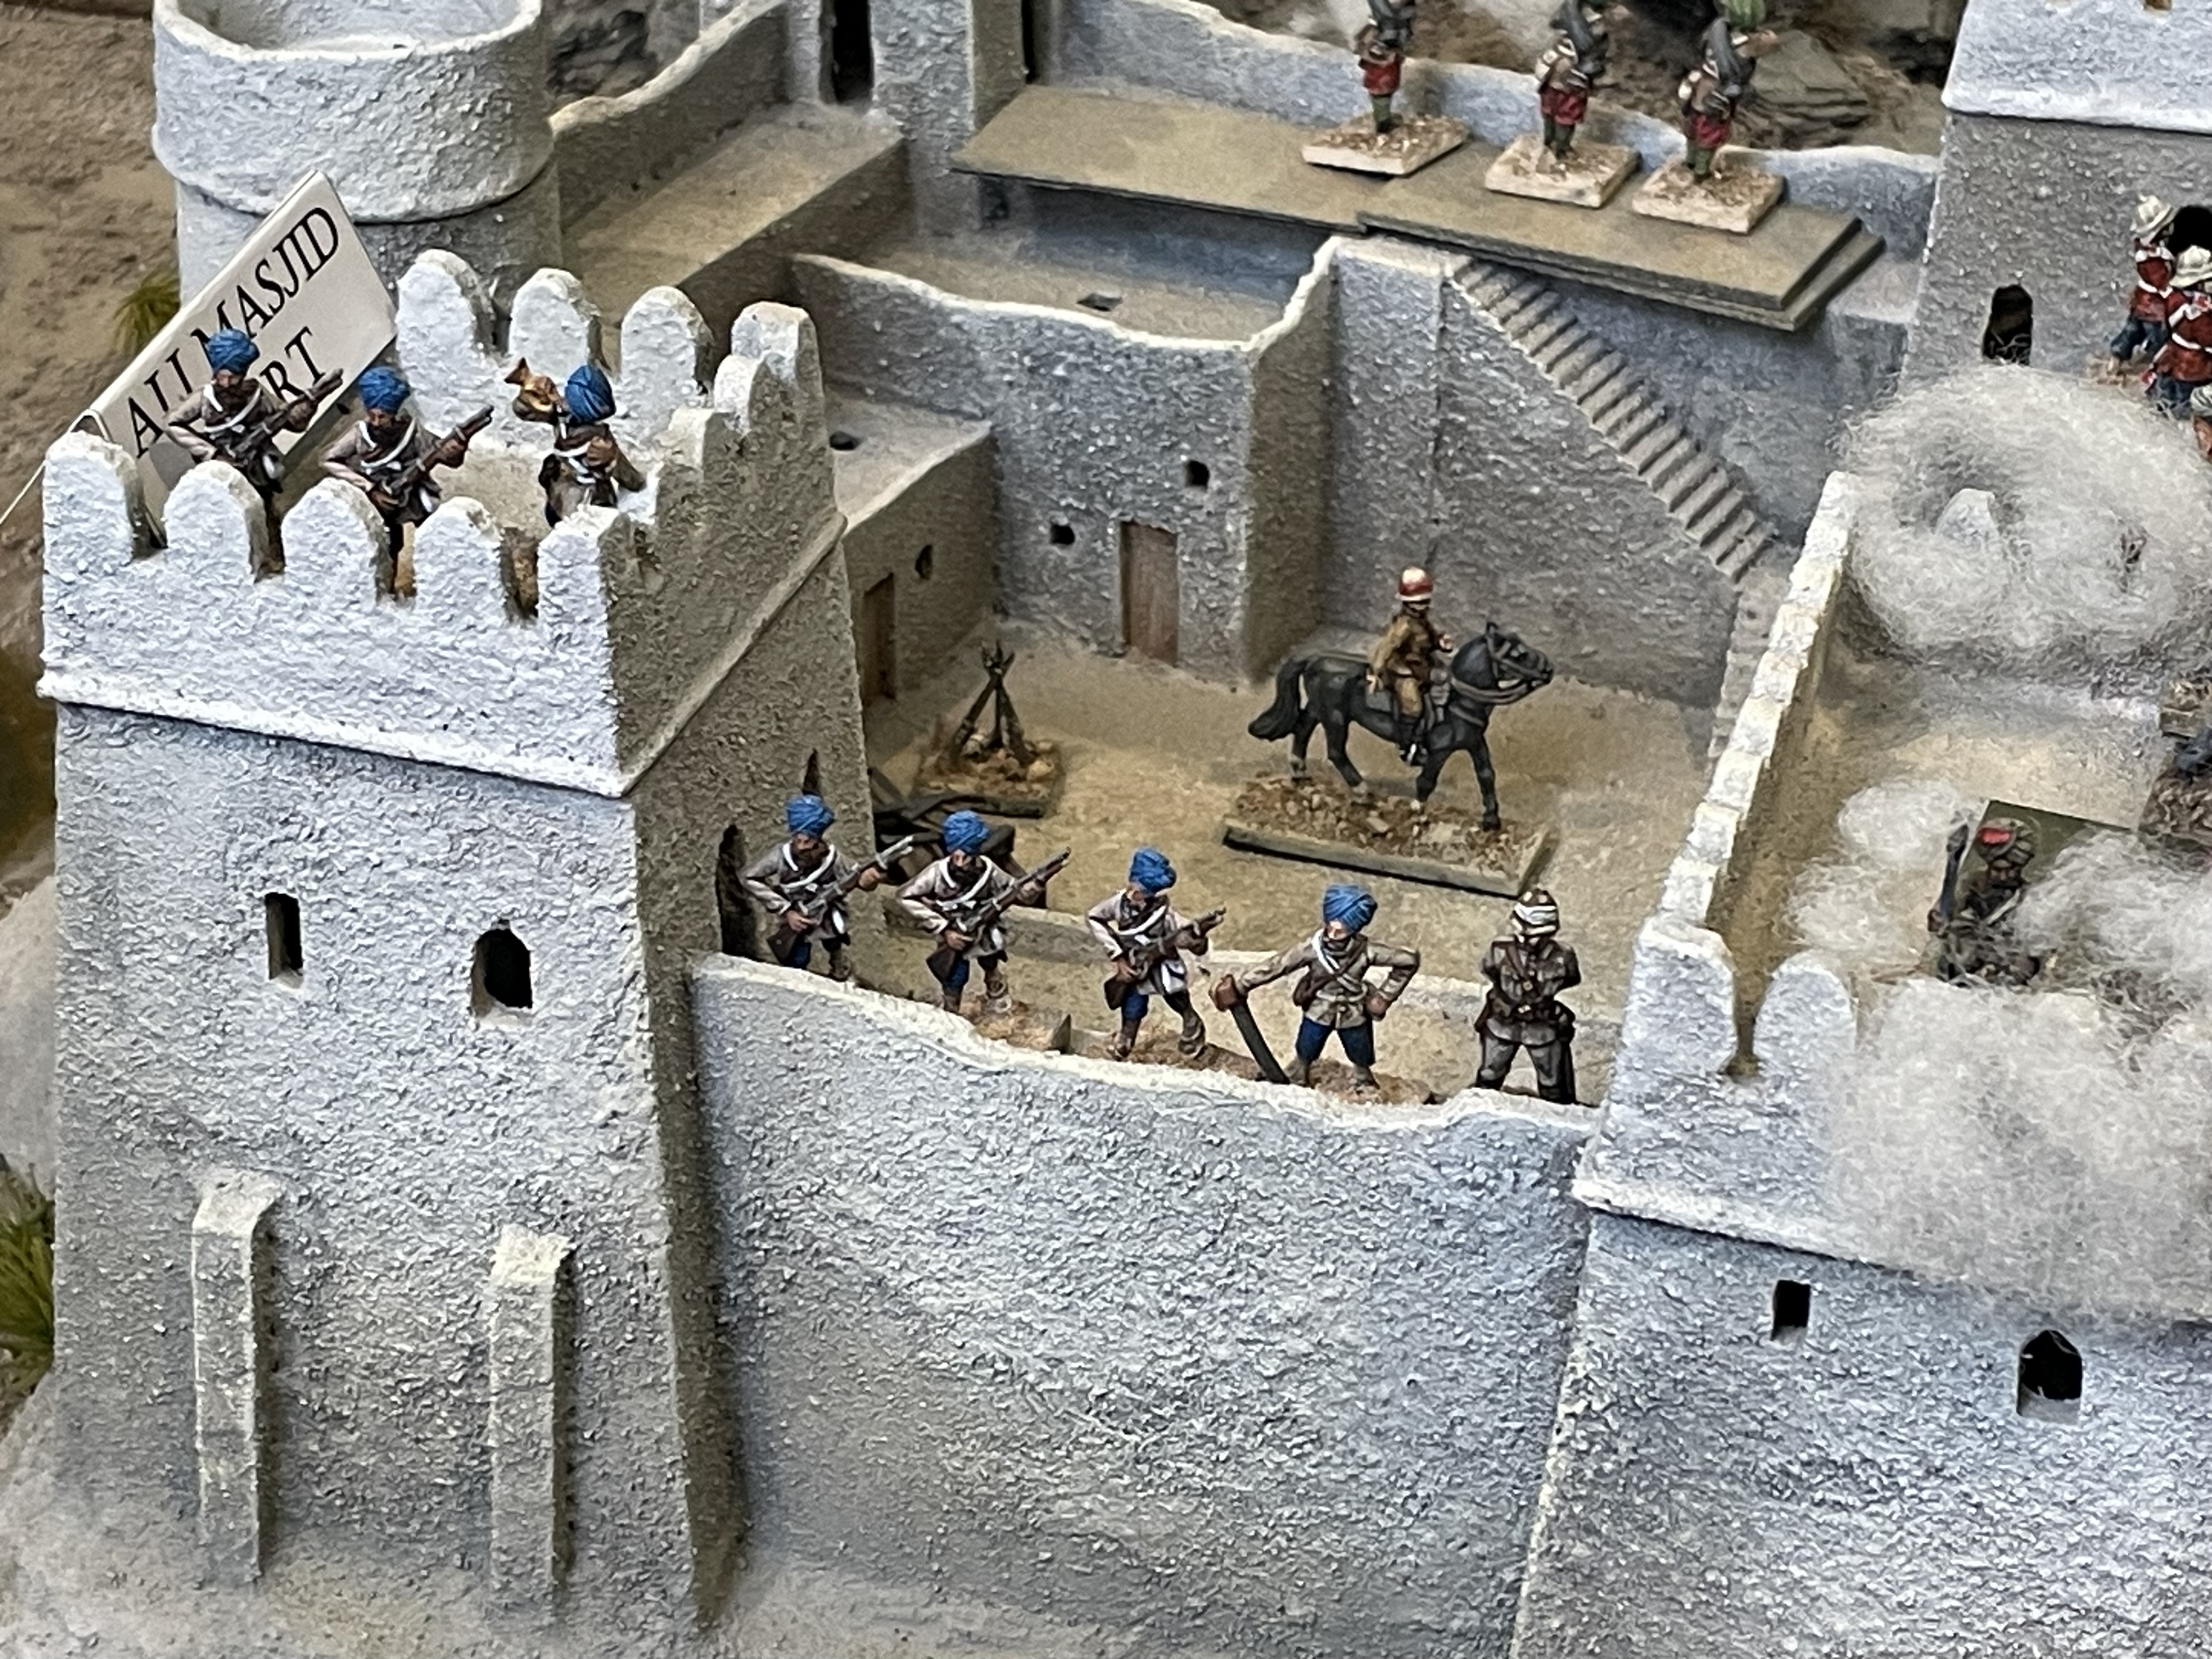
Troops of 45th Rattray's Sikhs in Ali Masjid Fort,
Mackeson's Road stretching South, Lala Cheena
Watermill visible along Khyber River in rear right:
The Relief Column split into 2 wings, one on each side of the Khyber River, and tried to sort out its advance...
But this was made more difficult when Mullah Musk-i-Alam and his hidden Tribesmen (Chick, in black on the far right) started to spring multiple ambushes on both sides of the river...
Afghan Reg. Cav. have exited
Tower but not yet remounted:
The exposed Afghan Gun Crew has taken 50%
casualties, one more hit and the gun will go silent:
...and so it went:
The Kandahar "Black Flag" Ghazis head
North across the river to attack the Fort:
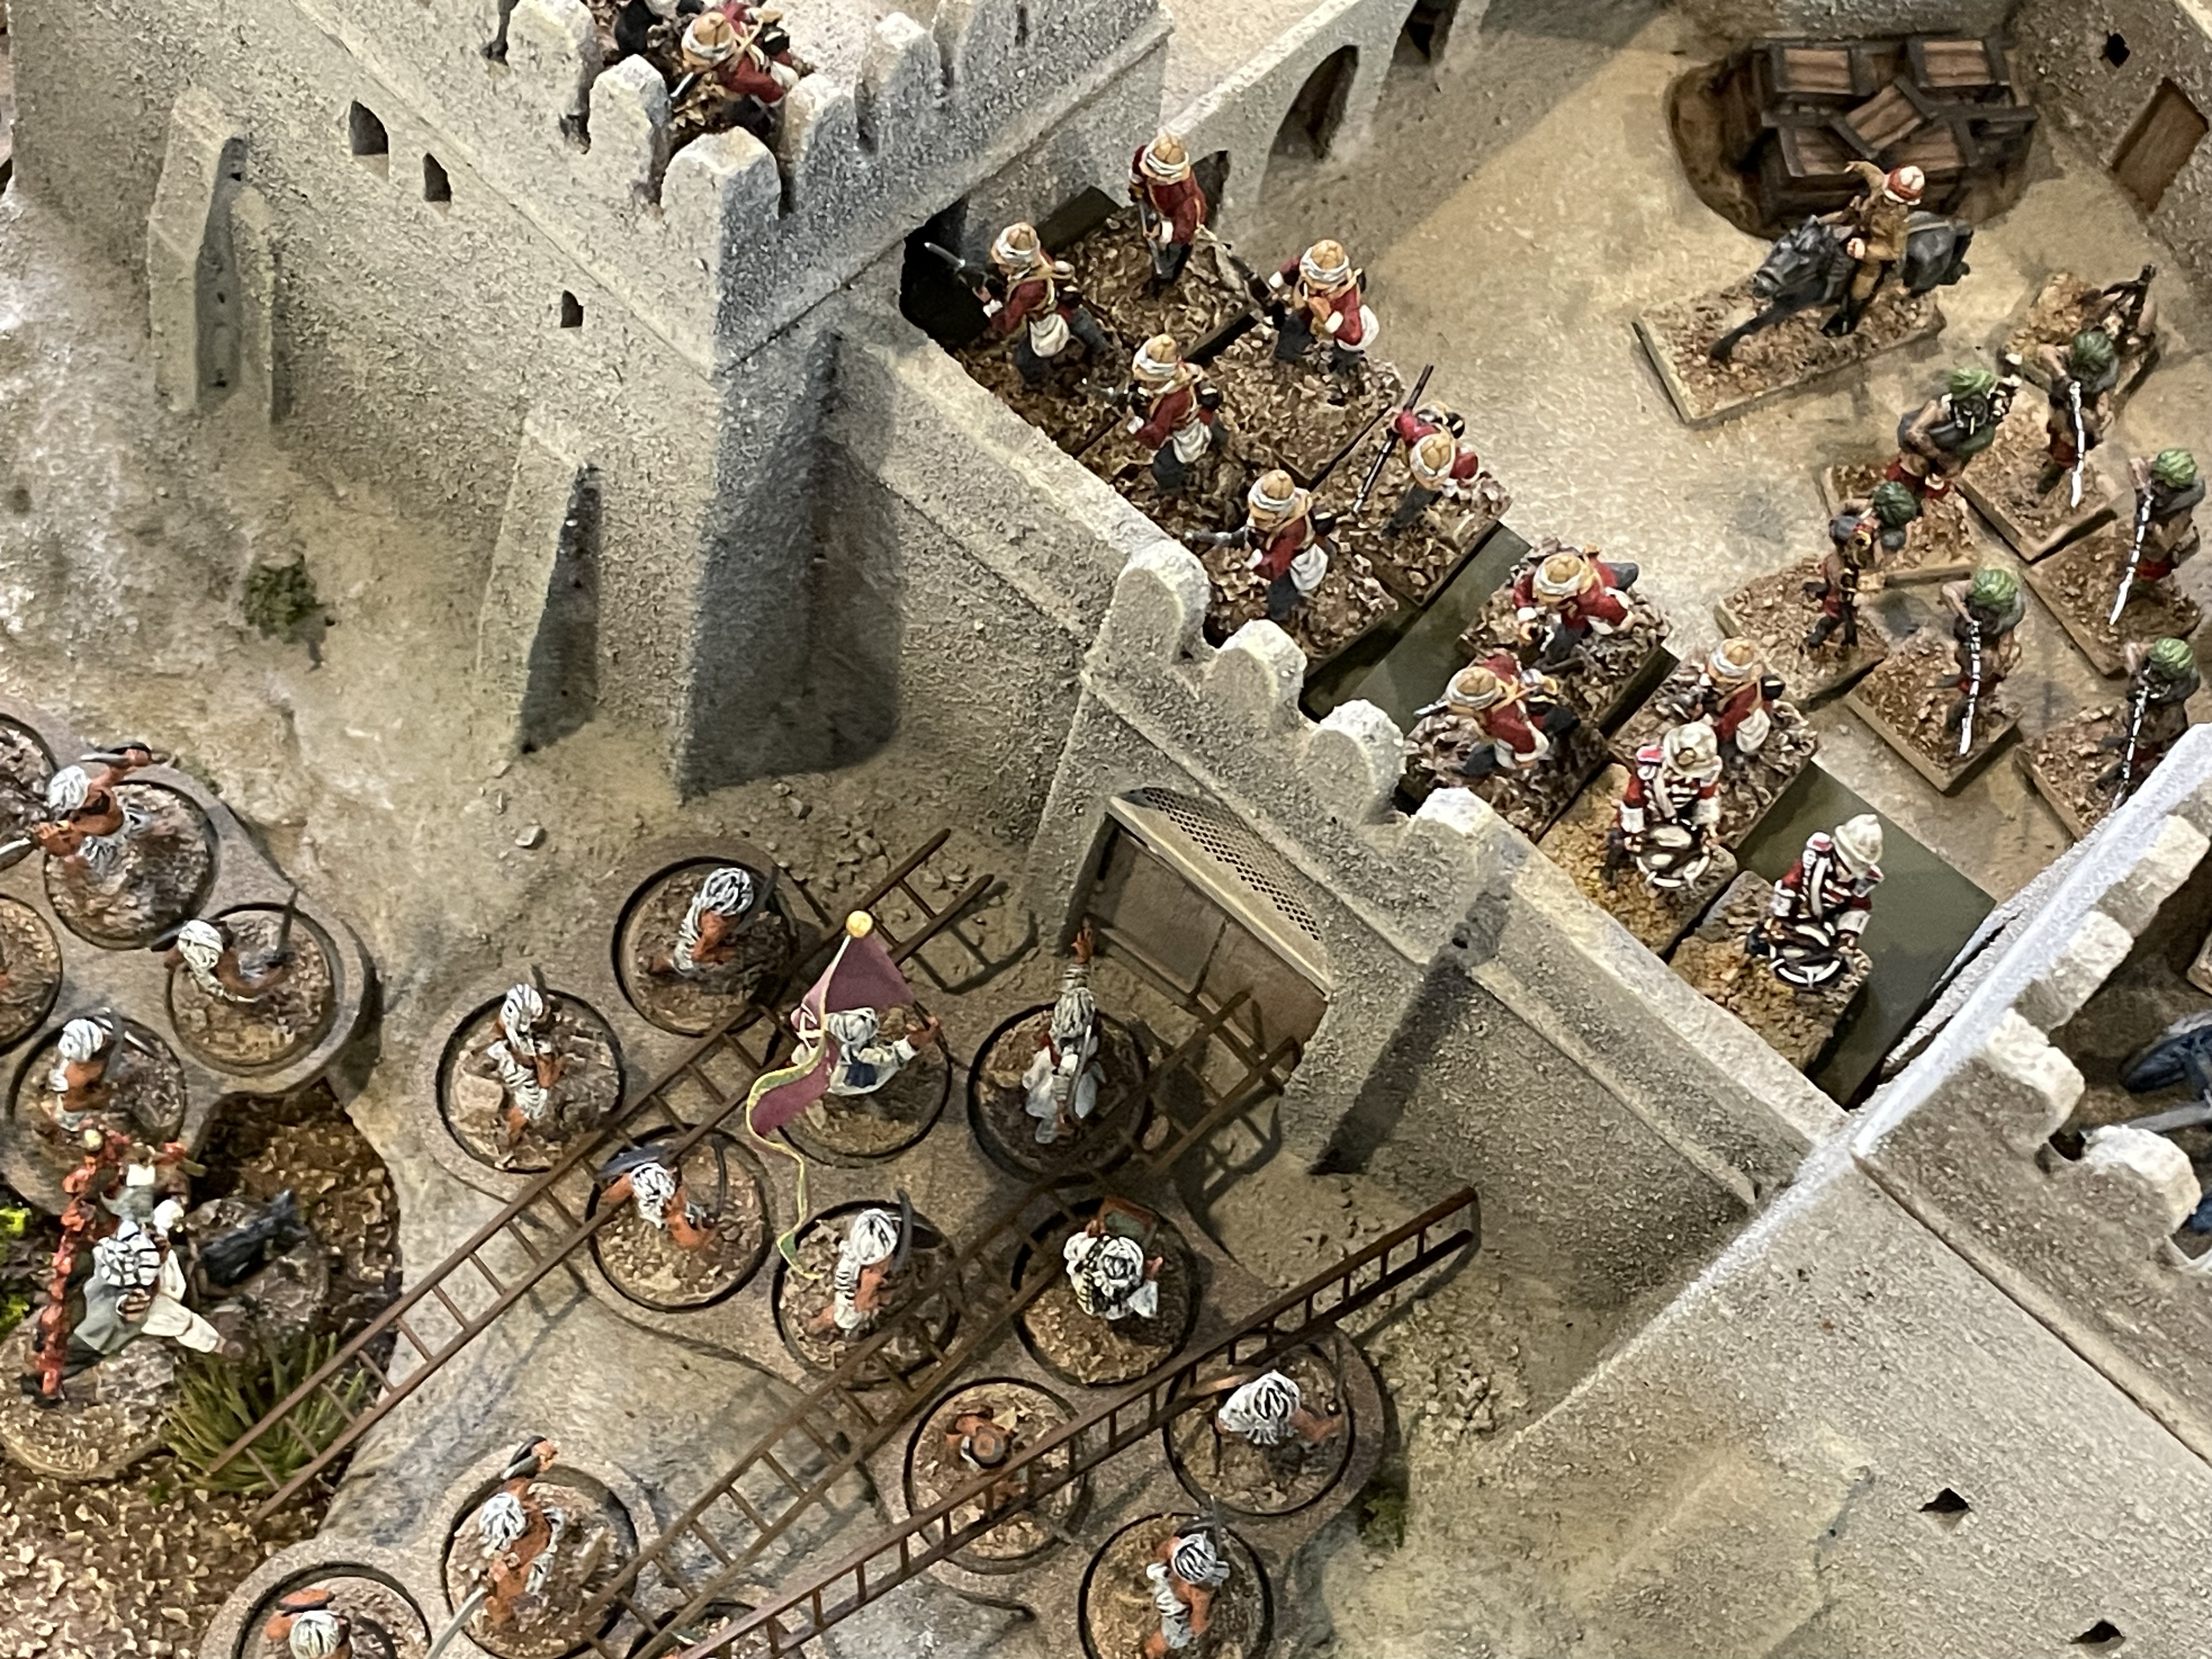
The scenario rules PREVENTED Afghan Regulars from attacking the walls, as such behavior would not be in keeping with their operational history -- BUT one of the 2 Ghazi units was provided with ladders for use assaulting the front wall (the side & rear walls were situated atop sheer rock faces too tall for such an approach).
The Afghan regulars were ALLOWED to assault the front gate when and if it was blown open by the Afghan gun scoring 24 hit-points, earned via ACCUMULATED casualty card FACE VALUES (Face cards = 10 pts; number cards = number value; Aces = 11 or 1 depending on a D6 roll-off).
But in this game, sadly for the Afghans, once the gun was silenced it was never reinforced by the Afghan commander, leaving the Ghazis with their ladders as the only tactic available to gain possession of the fort.
The Let Wing of the Relief Column
fights its way past Lala Cheena Village
Afghan Reg. Cav. remounts & attempts
a CHARGE -- but fails & is PINNED:
Casualty Card flips = bad news for LEADERS:
The Left Wing on West side of the River press on past Lala Cheena Village towards Tower Hill, driving Tribal ambushers before them...
Inside Ali Masjid Fort Brigadier Browne and his Fourth Brigade continued to take casualties but stood firm turn after turn -- until the thinned-out and leaderless ranks of 6th Bengal Native Infantry (Jat Light Infantry) on the Western Wall ramparts finally suffer a morale failure...
Brigadier Browne withdraws the Jats from the West
ramparts out of harm's way down to the courtyard:
The grind of battle begins to tell on both sides as the
Assistant GM's resolve Rough Terrain movement issues...
Multiple Afghan Reg. Inf. units to the West & North
continue to blaze away at the CLASS IV targets
on the towers & ramparts of Ali Masjid Fort:
The British Right Wing on the East side of the river deals with the remounted Afghan Regular Cavalry who RALLY, then CHARGE AGAIN at Third Infantry Brigade's 27th Punjabis...
...but lose the melee and are forced to retreat.
Across the river to the West, just beyond Lala Cheena Mill, Second Infantry Brigade's 1st Sikh Inf. (Frontier Force) turn to face Tribal ambushers on the unseen hill across the stream to the South. Also visible in the pic below, Royal Artillery Field Guns unlimbered and initiating COUNTER-BATTERY FIRE for the first time on unseen Afghan guns atop Rhotas Ridge to the North...
Guides Infantry CHARGED by Tribesmen down South
face of Tower Hill -- who failed to close into combat:
Kabul Ghazis flying their Purple-edged-green
banner, led by young Mulehead & with even
younger Umra in their ranks, charge the fort's
front wall and set their 3 ladders in place:
6th Bengal Native Infantry (Jat Light Inf.) rally and head back up to the ramparts...
British Generals Browne (DOUG, center) &
Gough (MATTHEW D., right) and Asst. G.M.
MATTHEW R. debate their best way forward:
Meanwhile to the North at Ali Masjid's gates:
British die-rolls result in...
ALL 3 ASSAULT LADDERS
being pushed down off the wall: (!!!)
The British Right Wing clears the Shagai Heights and advances on the Afghan Regulars occupying the South face of Rhotas Ridge as continued counter-battery fire by the British Field Guns deployed on West side of the river decimate the crew of the Afghan gun on the heights of the Ridge. This gun started the game pointed North and raining death on the fort, then turned South to hit the approaching relief column, but is now silenced for good...
More combat is resolved by GM & matched foes:
9th Queen's Royal Lancers are getting close
to the foot of the mountain adjacent to Ali Masjid:
British First and Third Brigades are making better time now, and the deployed Field Guns are raining death on the Afghan regular troops on Rhotas Ridge...
...But for the Kabul Ghazis at the North end of the battlefield -- on the far side of the mountains and safe from the approaching British artillery fire -- it's once more into the breach...
This time one of the three assault ladders
REMAINS UP AGAINST THE WALL...
AND SO THE DEADLY CLOSE COMBAT IS ON...
(Melee fought atop the walls or within the confines
of a fort are deadlier than usual for the losers, as no
"fall backs" are allowed & each loss is WIA or KIA)
And in the end it is the Ghazi MALIK (Leader)
& one faithful follower who emerge the victors:
YES, My Children, you guessed right! Their names...
Mulehead & Umra
(as seen in this Close-Up below...)
And so the battle/game reached a vital decision point...
Brigadier Browne (Paul pictured above) declares that with the 2 victorious Ghazis ensconced atop the ramparts, 20 more approaching the base of the wall below, and his garrison reduced to a shred of its former self, he is convinced it is no longer possible for him to hold until relieved.
And so the towel of Britannic Majesty was thrown in.
With this, the game was declared a narrow but definitive Afghan victory.
It was also decided under the circumstances that -- with the British "beaten" by the letter of the law but having more than a handful of effectives inside the fort as well as the still very powerful British relief column so close at hand -- in exchange for an immediate battlefield truce to be observed through sundown, (which was negotiated with the senior General Browne via the still present & accounted for British heliograph team in the fort) Afghan C-in-C Ghulam Haider Khan would grant the remaining garrison SAFE PASSAGE over the Khyber River, together with their personal arms -- though not the 2 screw-guns.
And so the battle ended...
The 9th Queen's Royal Lancers were close to
relieving Ali Masjid -- and yet so far:
Peshawar Field Force C-in-C Lieutenant General Samuel Browne, VC (Doug) seen below surveys the battlefield and can't help wondering...
...together with his Cavalry Commander Brigadier Gough, VC (Matthew D. -- shown distracted by his ever-present heliographic communication) and Asst. GM Matthew R. (whose heart seems to always be with the Imperials)...
...If their mission itself always been:
...A BRIDGE TOO FAR?
MORE VIEWS OF THE BATTLEFIELD...


And now we return to the last two surviving victorious Ghazis atop the ramparts -- who it can be said were THE KEY to the Afghan victory: namely the future Mulehead Khan and future Umra Khan, as pictured below in even closer Close-Ups...
In the immediate aftermath of victory, Mulehead and Umra's heroism was celebrated by their brothers-in-arms, as was the memorable battle-cry one coined at the height of the melee, which was heard from below by the approaching Black banner Kandahar Ghazis, as well as the nearby Afghan Regular Infantry, AND EVEN the last surviving Indian mountain gun crewman, who just so happened to speak Pashto.
What they all heard was, "Yaw zanbil aw Allah ta barakat!" Which translates into English as:
ONE LADDER AND ALLAH'S BLESSING!
But somewhere along the way -- as the majority of the Afghan victors picked the fort clean and proceeded to head back home -- this noble utterance, giving due thanks to the Prophet, Blessings be upon Him, for enabling his Faithful Warriors to crown the heights and earn victory with their blood and steel (in a personal sacrifice sense, not a rules title sense!) turned into, "Yaw ghazi aw Allah ta barakat!" Which translates into English as:
ONE GHAZI AND ALLAH'S BLESSING!
Yes, My Children.... it seemed as though someone was trying to take ALL the credit for the victory and throw his fellow Holy Warrior under the camel's hooves.
To claim he alone was left standing atop the ramparts of Ali Masjid to deliver victory unto the Faithful.
Did this start as a mere misspoken turn of phrase -- an innocent happenstance -- or was it a twisting of the truth purposefully committed by Mulehead... or Umra... or some third-party provocateur?
Alas, we do not know. Indeed, we may never know.
But we do know, My Children, that this IS the heretofore SECRET ORIGIN of the longstanding feud between these two larger-than-life characters of the North-West Frontier.
Young Umra & Mulehead
began the Second Battle
of Ali Masjid like this...
...but ended it like this:
...but ended like this:
...And a great pity it was to be sure.
And so the lesson for the wise
man, woman or beast to be learned
from the origin of their bitter feud is this:
NEVER AGREE TO A TRUCE WITH THE ENEMY!
For if the battle had been allowed to proceed,
Neither of them would have survived, or
Just one of them would have survived, or
Maybe both still would have survived...
BUT
By then no one would have cared about what was said
On the ramparts or how those words were later
Twisted to gain Blessings... glory... women... gold...
Or all of the above.
So, my children, always fight to the bitter end, and by so doing
You shall avoid such little, silly, petty, barbarous and cruel matters
Eating away at your honorable nature & reputation.
And last but not least, remember always:
NEVER TRUST ANYONE ON THE FRONTIER!


What a beautiful looking and terrain board!
ReplyDeleteThanks, Wesley!
ReplyDelete